Frequently asked questions about the Plant Booster self watering system
First: Count the number of potted plants, both hanging and standing.
Second: Determine the route the tube will need to run to be generally out of sight from the garden hose faucet all the way to the furthest plant in the system. Make sure to include enough slack to be able to run the tube out of sight. A straight connector is needed to connect lengths of tube together if needed. This is the main “header”.
Then: measure the lengths of tube needed to tee off the header to supply each plant along the route of the header. Remember to allow enough length to run the tube generally out of sight.
A typical 6 pack is provided with 7 Tee’s (the last plant won’t need one, so that means two spare), plus two straight connectors. Any additional tube purchased will come with extra straight connectors. If a length of tube is cut too short a straight connector will be needed to add more length.
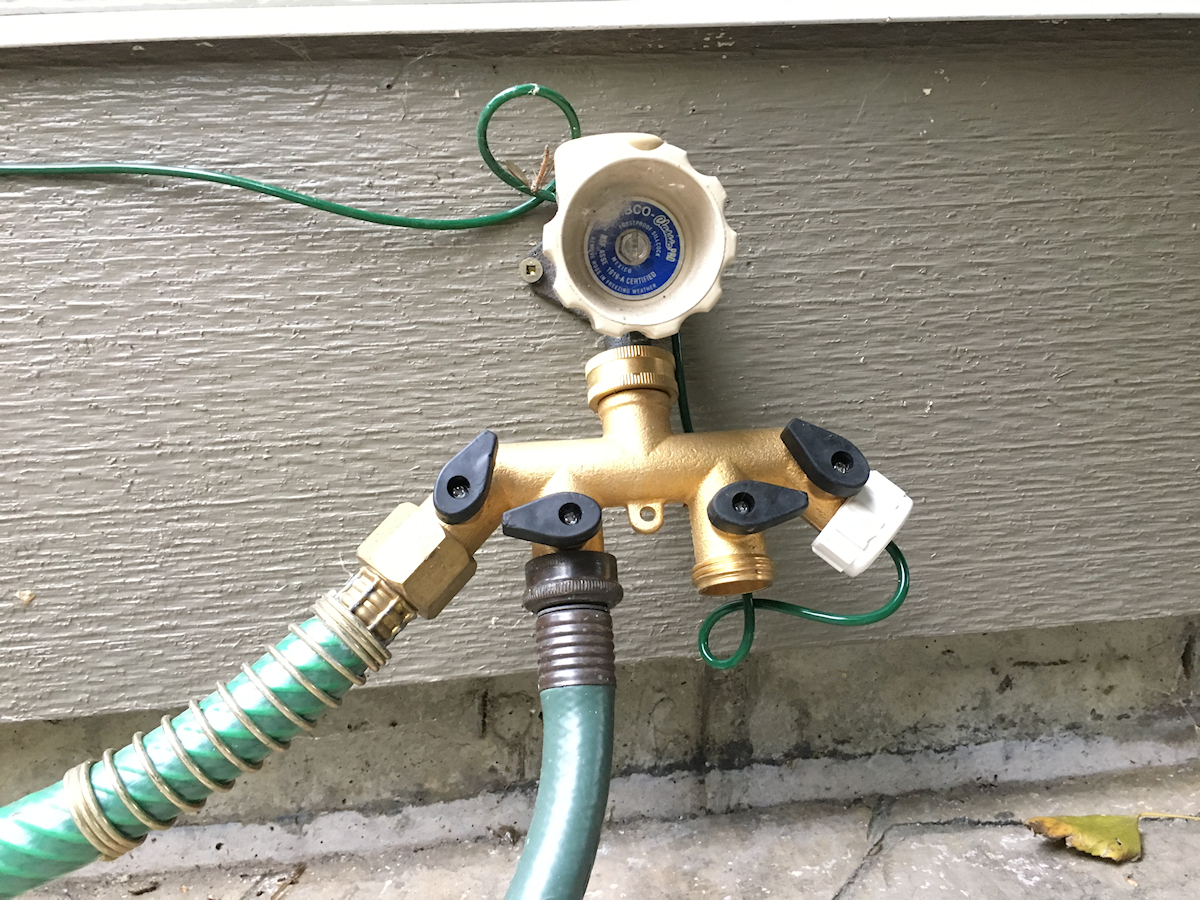
Yes. The faucet connector is the same size and thread as a regular garden hose (3/4″). It is recommended for your convenience to use a Y-splitter at the garden faucet so you can also still connect your garden hose. With a four-way splitter you can have one for the Plant Booster system (which you leave on always), one for your garden sprinkler system, one for a hose pipe, and one spare.
Yes, this is one of the strengths of this Plant Booster system. The Plant Booster system doesn’t try to compete with regular irrigation systems, but rather complements them, by handling drip irrigation to container plants in a much more simple, but much better way without the need for timers or electronics of any kind. While other systems are great for watering the lawn and flower beds, the Plant Booster System comes into its own on decks, patios, and verandahs, where it is beneficial for hanging baskets and container plants to be given only as much water as they need, on demand, whenever they need it. Overwatering plants on decks causes a lot of mess. By using a Plant Booster system this can be avoided.
There is no need to discard an existing system. Most of these systems use 1/4″ PVC tubing. If you already have 1/4″ tubing close to where you would like to install you Plant Booster system, then it is a simple matter of using a reducing connector. It is, however, better to use a dedicated circuit from your existing system with the timer control for that circuit set to 24/7 or “always on”.

If you have no option to link a Plant Booster system onto an existing irrigation system which still gets fed via a timer, it will mean that the Plant Booster system won’t give you the very best benefit as it will only control water to the plants while the timer to the circuit it is on. This means that instead of the Plant Boosters being able to manage water supply to the plants 24/7, it will only do it for the short times that the timer is on. Provided the soil in the containers does not dry up between timed waterings, the Plant Booster device will allow water to flow until the set-weight (of each container in their fully watered state) is reached, thus still preventing over watering.
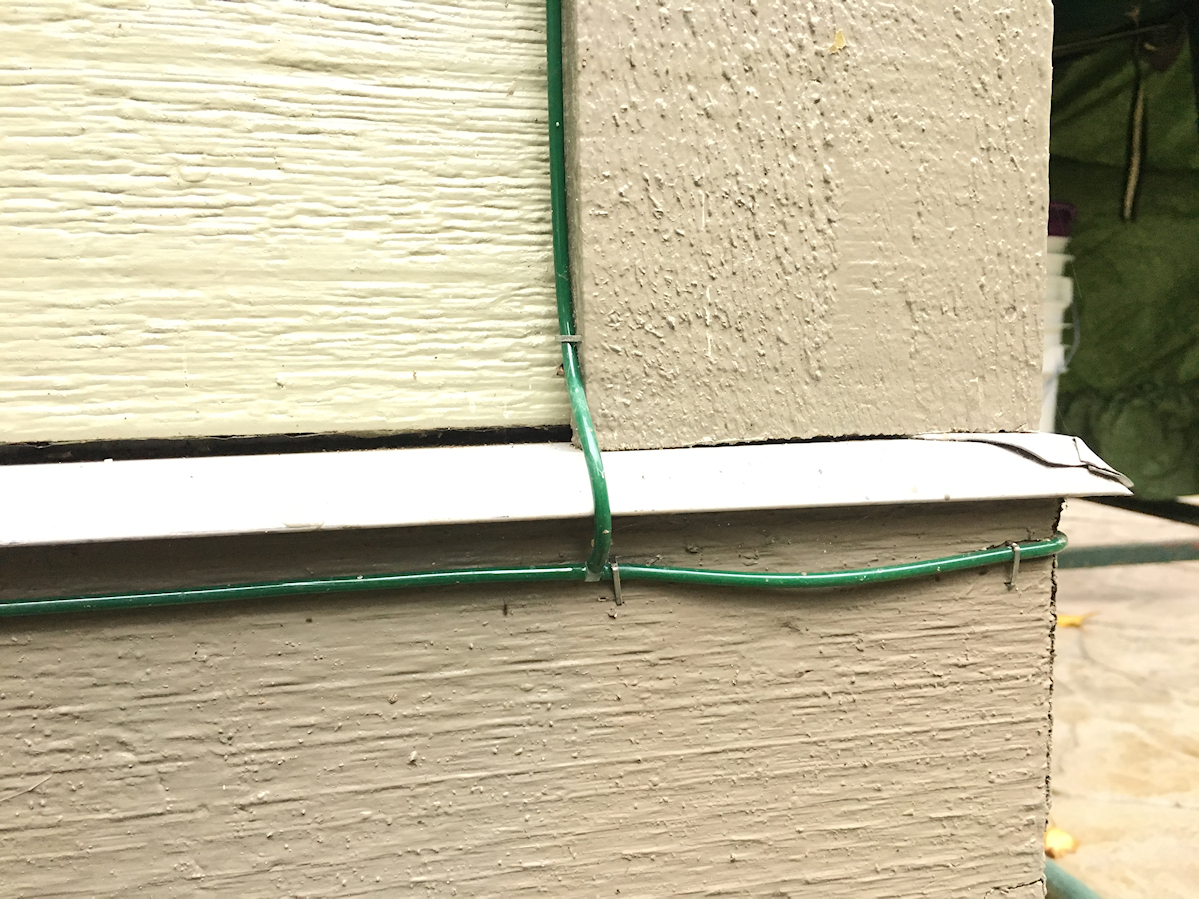
The simplest method is to use a staple gun, such as the Stanley 2in1 Cable Staple Gun model CT10X which can use a rounded head staple.

Staples are shot in about a foot apart, and pried slightly up to easily feed the tube through so it is not pinched at the staples. This will keep the tube neatly in place. For sections between the house and a hanging basket stand, for example, the tube could be run in the ground in a shallow trench and covered over out harms way and out of sight. If you do bury the tube in places make sure that it is not in a place where a flower bed, for example, might be turned over with a spade, thus running the risk of damaging the tube.
It is difficult to shoot staples in to secure the tube after the tube is already in place, so a certain amount of planning is needed so that there are staples where they will best keep the tube in place. It is a good idea to have a staple located near a Tee to secure it at that location.
Yes. The system is always on with full system water pressure to each device on the system. It is this that makes the Plant Booster system uniquely capable of looking after watering your hanging baskets or potted plants on a 24/7 basis. Since each hanging basket and potted plant has its own control device, each basket and potted plant therefor gets individual attention, giving each plant water as and when it needs it, and only as much as it needs.
Each device, at each plant, must be set to allow water through it at the weight pre-set for each basket or potted plant by adjusting the wing nut on the device. The device will react to the weight of the plant. It must be set to the desired weight of the plant, and after that it will constantly strive to maintain that weight.
Start by watering the plant to the fully watered state (from hose or a watering can), and hang the plant onto the device.
Turn the wingnut on the device to relax the control spring. This will cause any flow that might already be flowing to stop. If the water to the Plant Booster system is not already on, turn it on.
Turn the wingnut clockwise to tighten the control spring until water starts flowing through the device and into the plant. Because you have already fully watered the plant in the first step above, now turn the wingnut back a little so that the water just stops flowing.
Test that the water will flow if you just lightly lift the plant. The device should now be set correctly. Any reduction in the weight of the plant will now cause the device to allow water to flow to replace that weight loss.
There should be no excess water dripping from the plant. If that does happen the device wing nut must be backed off a little so it stops adding water to the plant. It may take a few days to find the optimum water content or weight at which no excess water will drain from the plant.
The real beauty of this system is that each plant therefor gets individual attention. Two identical plants, one in the sun, and the other in the shade will have different water requirements. This makes it unique from a regular timer operated drip irrigation system where all plants get water from a set period each day, whether they need it or not.
While the barbed connector fittings are capable of 125 Psi water pressure, they are not very strong structurally, and excessive force when pushing the tube onto the barbs can easily break them. They are not expensive, and we will gladly ship some more off to you in an envelope, but to push the tube onto the barb correctly there are two ways.
9 times out of 10 if someone complains about the tube coming off the barbed fittings under pressure, it is either because the tube has been overheated (such as in a flame) before being pushed over the barb, or because the tube has not been pushed all the way over the barb.
In the pictures bellow, a good connection is contrasted against a poor connection.
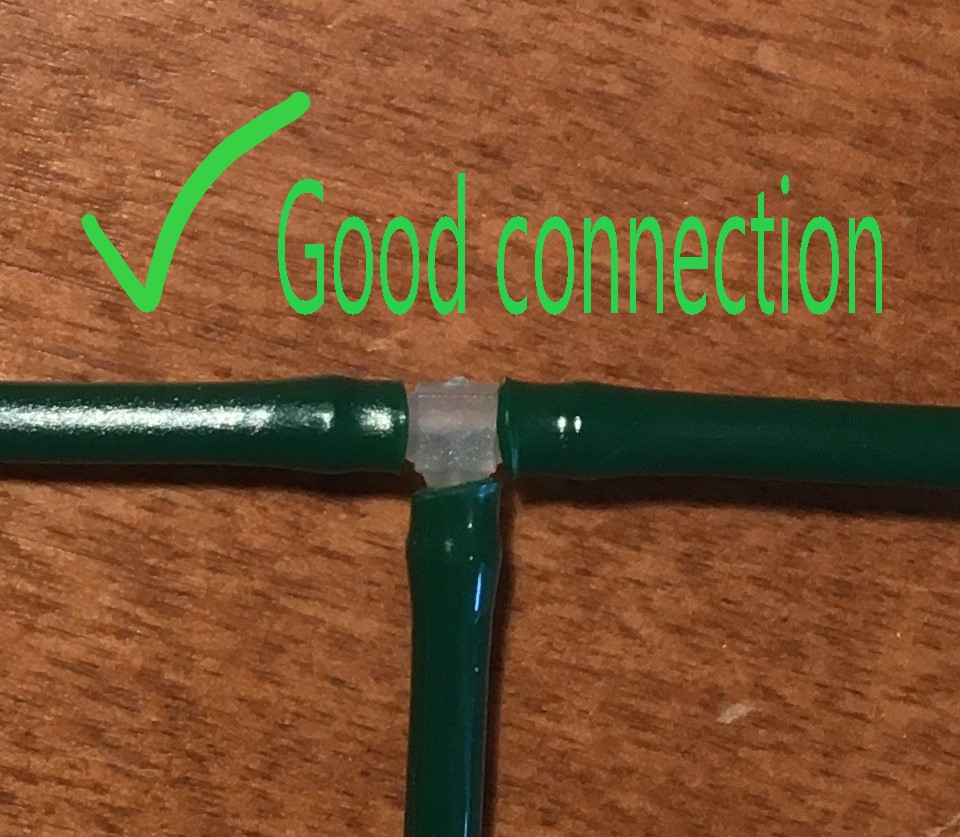
The easiest way is to cut the tube off straight with sharp scissors, and to hold the tip of the tube in boiling hot water for about 10 to 20 seconds. The warmer the tube tip is, the easier it will be. Boiling water does not damage or weaken the polyurethane. Heat will cause the tip to be softened up, making it easy to slip over the barbs. If for some reason you only get the tube over the barb partially before it cools down too much, and you can’t pull it off anymore, you may need to consider redoing the joint. This may take a little practice. The polyurethane tube is flexible and stretchy, but this does underline the need to leave a little slack in your tube layout until you gain enough experience.
There is also a Pincher Tool you can make yourself. This will allow you to push the tube over without any heat. Check out Q18 for details.
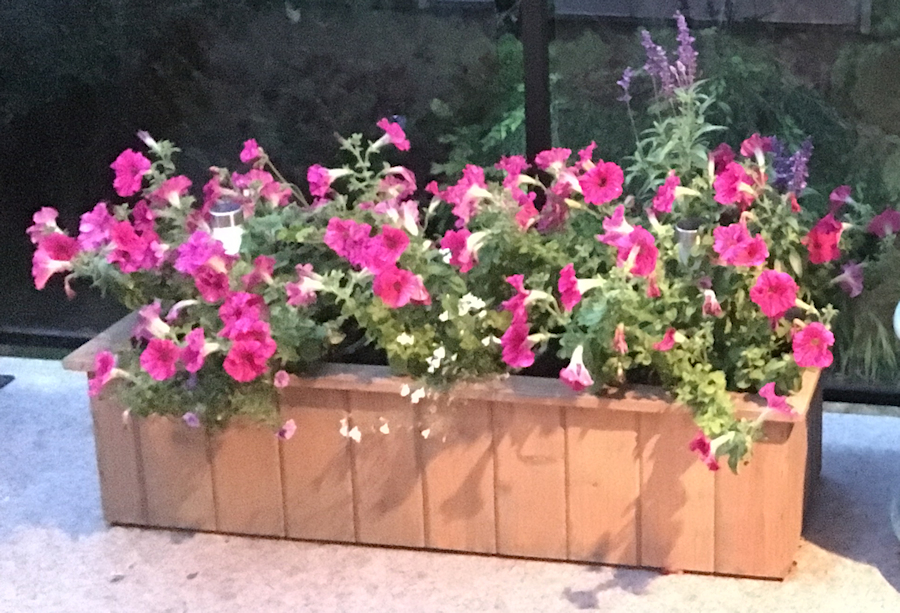
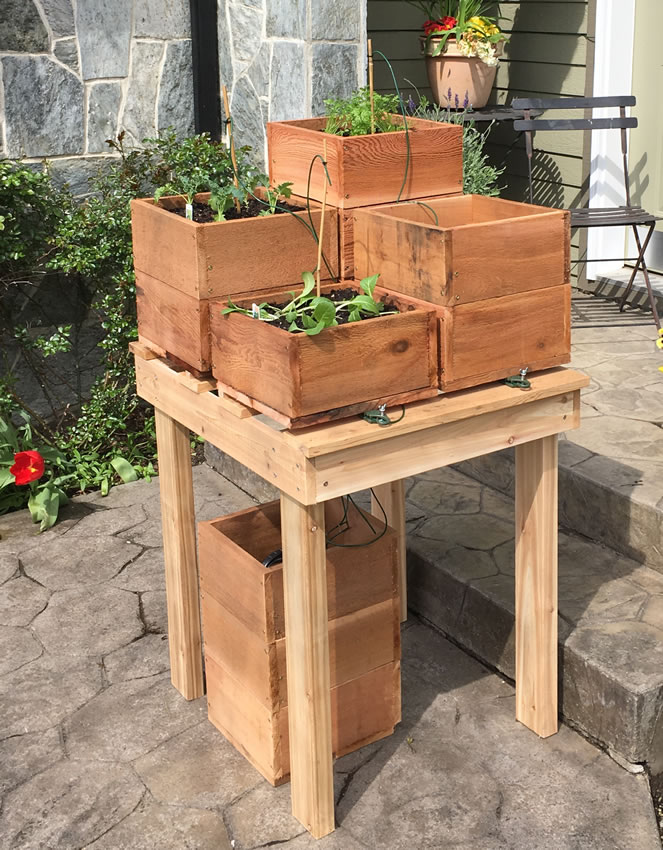
The best way to use the Plant Booster system for plants in along planter is to set up a series of individual pots, each on their own Plant Booster control device. As they grow, the foliage all blends and it looks like one long plant. This way all the plants are individually watered and you can be 100% sure that they will all be watered correctly.
The picture below includes three pots in a 3ft long cedar planter box.
The Plant Booster device uses a control spring to counteract the tendency to close under load. While the device physically will not fail until a tension load of about 70lbs has been applied, it will start to deform excessively at about 50lbs, and beyond that load the control spring will not be able to counter the load. The device will therefor simply shut the flow at about 55 – 60lbs, and eventually break at the hook at about 70lbs.
Therefor, when a Plant Booster device used in the conventional way for controlling water to a hanging basket the maximum recommended weight at which the device will still maintain proper control of water flow is 40lbs. The specific Nylon formula used for the device is stable in strength up to about 200deg C, and therefor normal outdoor temperatures should not affect this maximum weight. There is obviously some margin in these numbers.
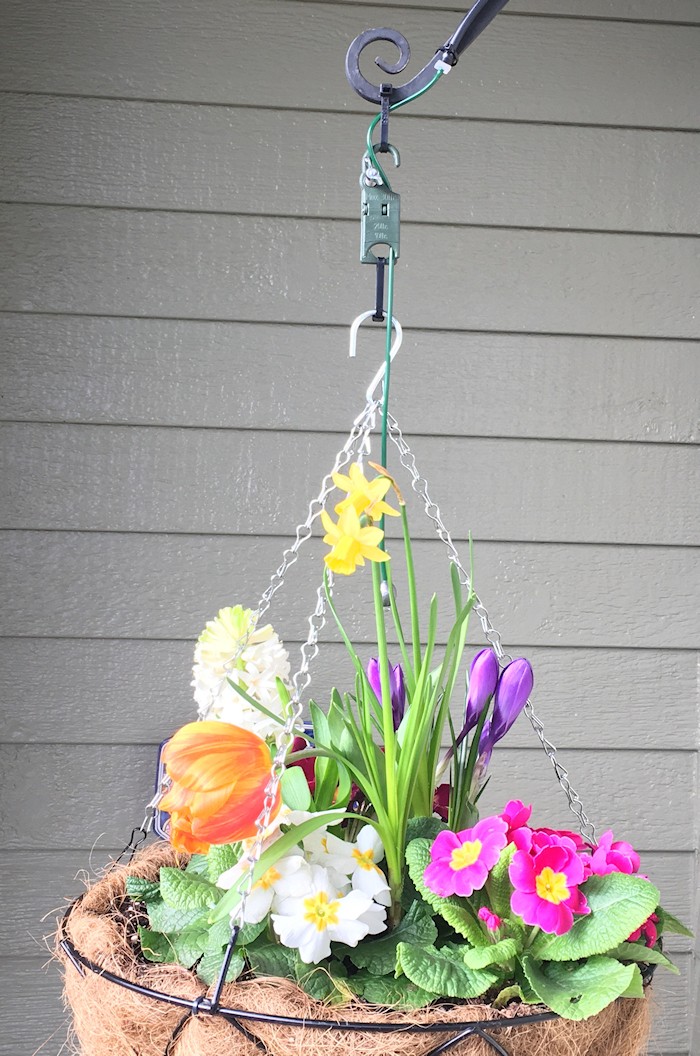
Using the simple principle that in a hanging basket with three strands, the weight the basket is equally carried by each strand. Therefor is the Plant Booster device limit is 40lbs, and if the Plant Booster device is installed in one of the three strands as pictured below, then the maximum weight of a hanging basket would be 120lbs.

Besides the basic use of the Plant Booster system for hanging baskets, using it for planters or potted plants is a really interesting way. Whether it is for a pot full of flowering plants for growing vegetables, once you understand the principles of setting it up it will expand your world of possibilities with the Plant Booster system.
The Plant Booster device is essentially a spring loaded pinch valve. Load, whether applied as a weight in tension (like for a hanging basket), or resting on the device (like for a potted plant) will cause it to deflect which will cause it to pinch the tube. The control spring and wingnut are used to counter act this pinching. The higher the load, the more the control spring must be compressed (by turning the wingnut clockwise) to try to keep the tube from closing. At some weight, the tube does become pinched, and water stops flowing into the plant. A slight reduction in the load, or weight, will cause the tube to be un-pinched slightly, thus allowing water through it to re-establish the weight again.
When the Plant Booster device is used to control water flow to a potted plant it is important to understand how the weight of the pot is distributed.
There are so many different pot sizes and shapes, that each one will require a slightly different setup. The way to do the setup is explained below.
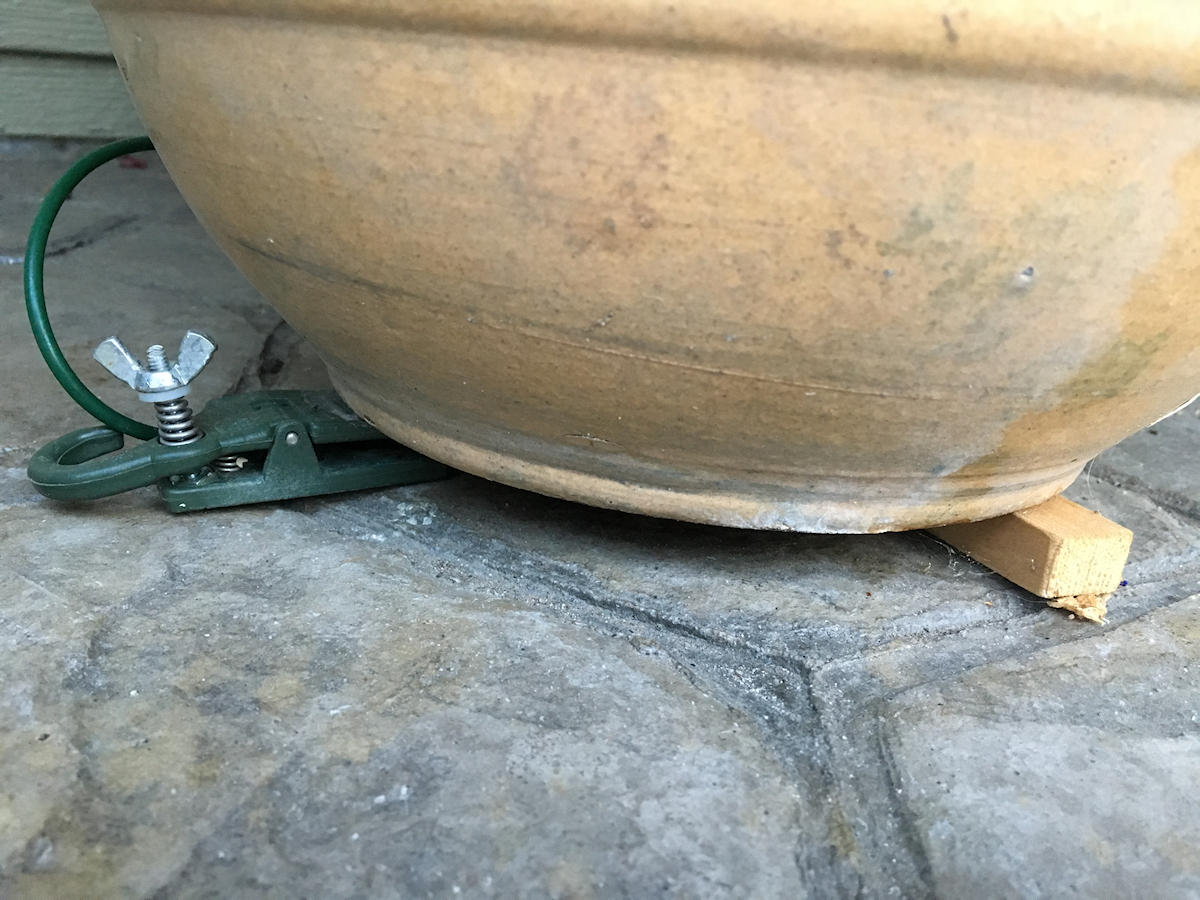
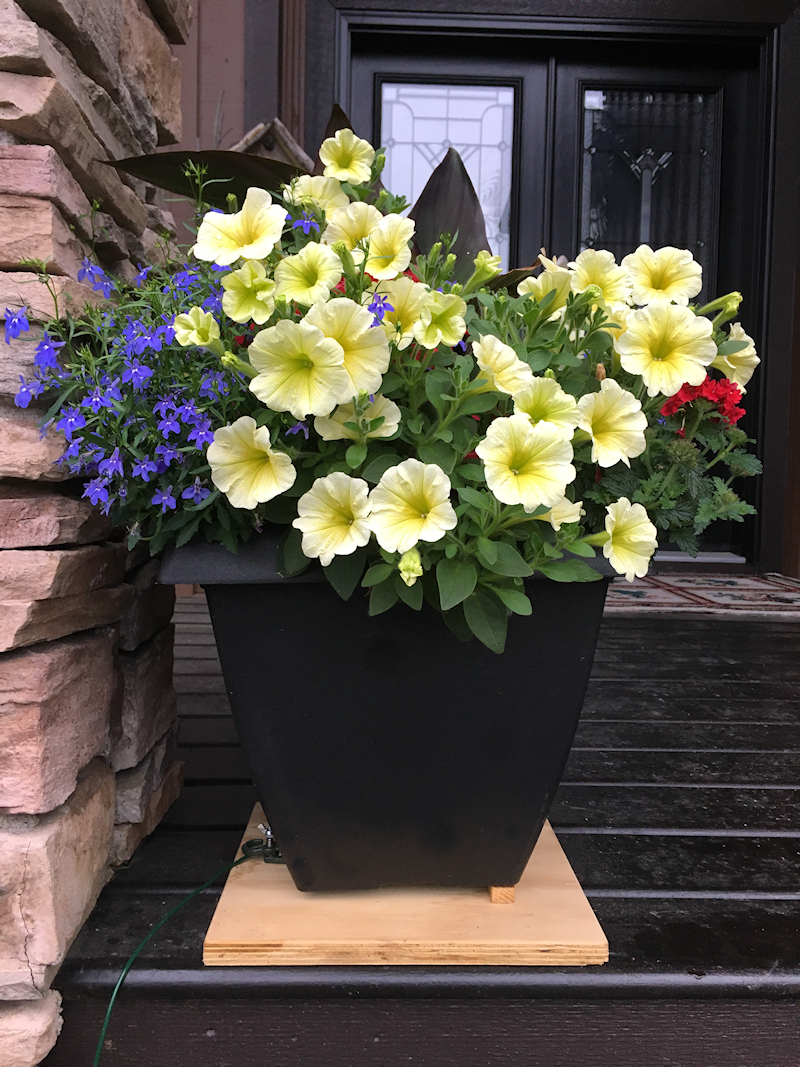
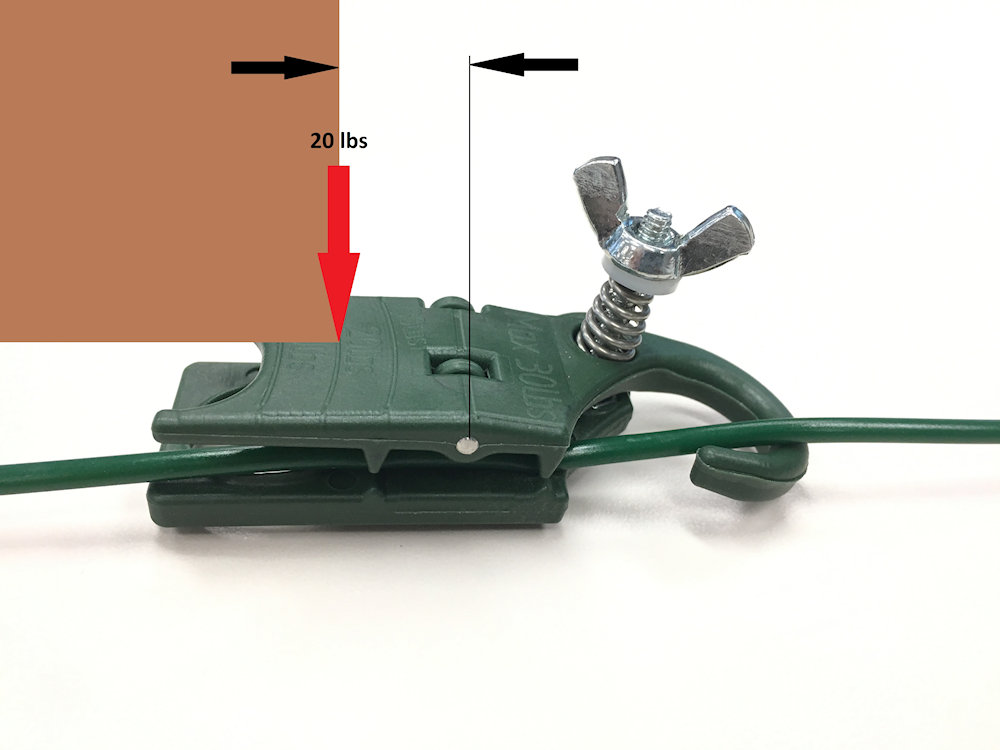
In the picture above, which represents the most basic setup, the pot is resting on a block of wood, or fulcrum, (which goes right the way to the other side) and the device. The pot is therefor resting on a straight pivot edge, as well as a device, which effectively makes it a very stable setup. The weight of the pot is divided between the fulcrum and the device as indicated in the sketch below.
An upgrade from this setup is to make a base plate onto which the fulcrum block and plant booster device are screwed down. This is more work, but will make the whole setup more reliable and make it easier to keep the pot in the right place on the plant booster device. If someone cleans around the pot, with the most basic setup, the pot could be bumped and thus upset the balance, but if the device and fulcrum are screwed down to a base plate, the position of the pot on the setup is easier to correct if someone does inadvertently move the pot.
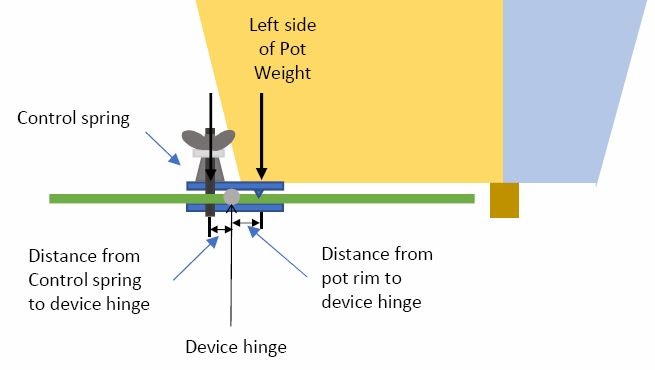
The principles of how to get the position of the pot on the fulcrum and the plant booster device are illustrated in the sketches below.
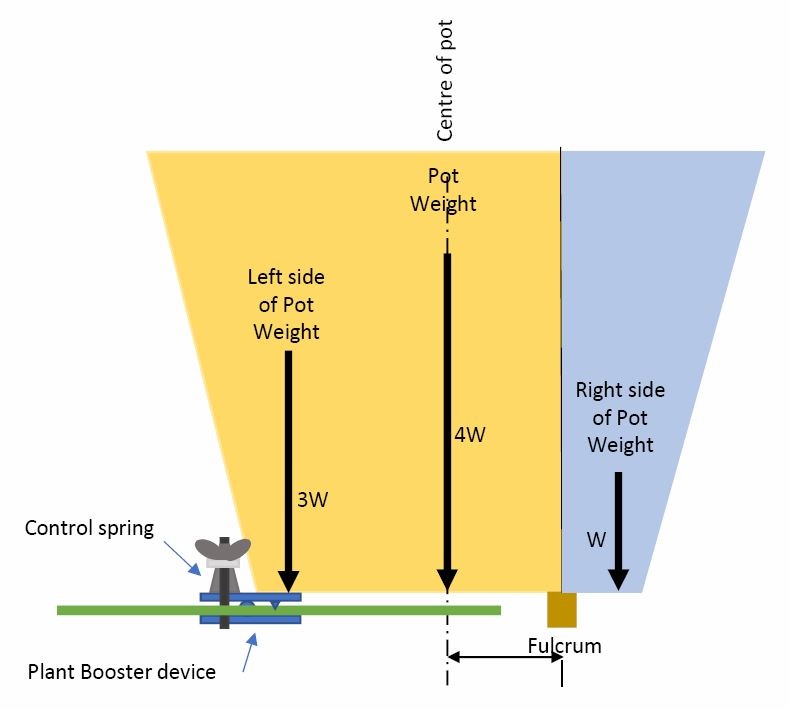
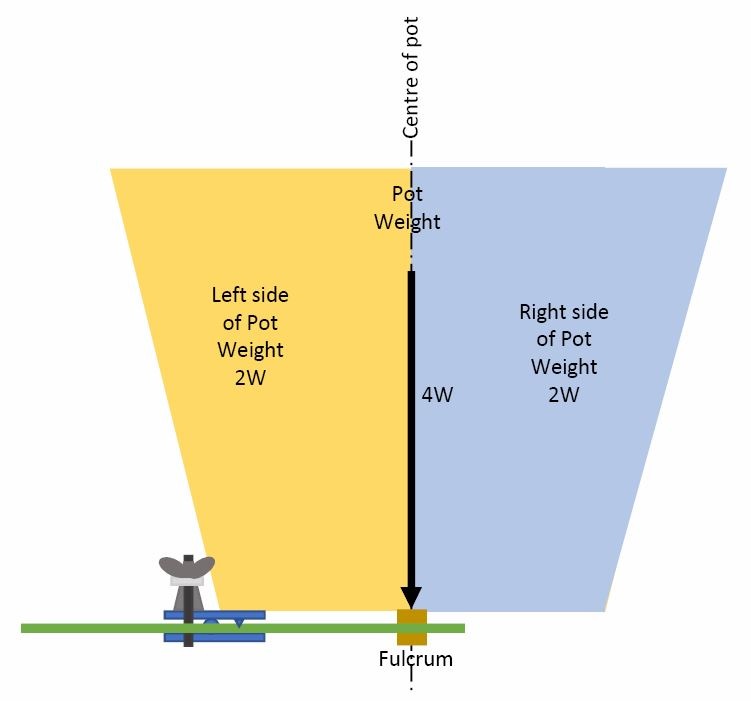 When the fulcrum of moved closer and closer to the center of the pot, more and more of the weight of the pot will be transferred onto the fulcrum, and therefor less and less onto the device. In the extreme, the full weight of the pot could be balanced on the fulcrum, and none on the device. The trick is to find the position of the fulcrum for your pot where the weight transferred onto the device is within the capacity of the device.
An additional variable in this challenge is that the rim of the pot resting on the device can be moved closer or further away from the pivot point of the device. There are markings on the top surface to aid with this. The closer the rim is to the pivot point, the heavier the pot can be. For light pots the rim should be further away from the pivot point.
In the experiment below it was possible, by moving the fulcrum to 5 cm from the center of the pot, to fill the pot to 207 lbs with water, and just remain within the maximum control range of the device. In other words at this point if I touched the pot slightly to simulate it becoming lighter on the device, the device would still allow more water through.
My experiment was performed with a water pressure of 110 PSI (typical pressure at a garden tap supplied with city water). At lower pressures results may vary slightly.

Therefor, by adjusting BOTH the position of the fulcrum relative to the center of the pot, as well as the rim of the pot resting on the device, the right positions can be determined for balancing your pot on a fulcrum and a device while staying within the control range of the device.
Once you have achieved a good setup, mark the location of the fulcrum and the rim on the device, so the setup can be corrected without much effort if the pot is moved form its position (such as when the floor is cleaned around it).
With a little practice, perhaps, like I did, with a container filled with water (so the weight is accurately known), you will soon understand how to set up the Plant Booster system on your pots.
Yes it can – provided the water source is a limited volume reservoir, like a vase or a pail. The water level in the water source must be about 8″ or more higher than the end of the tube that drips into the plant so that gravity can do its magic. It is simple to set up a siphon from that water source by sucking the water through, and then placing the tube through the Plant Booster device as you would for setting up any planter.
The maximum drip rate will be much slower than when the water is supplied by house pressure, but when a plant has 24/7 to get its water as and when it needs it, there is no hurry.
When located in a house which is kept at a comfortable temperature, house plants typically do not consume as much water as plants outside in the heat. You can experiment and pick a volume which lasts long enough for you and work from there to arrange a volume sufficient to water your plants while you are off on that well deserved holiday.
It must be noted, however, that when connected to an always on outdoor water source, like the garden tap, the Plant Booster system is intended for outdoor use because the barbed fittings are not considered appropriate for indoor use. The water is supposed to always be on to get the most benefit from the way the system works. If for whatever reason a plant is moved off its device, or a tube was to come off a fitting, for however long you are away water would continue to flow onto the floor of your house, which is probably not a great idea.
When house plants are being fed from a limited volume by gravity, the risk of water spillage is thereby reduced to whatever level you are comfortable with.
As opposed to regular irrigation systems, the HDPE or PVC lines of which should be blown empty of water before the frost comes, The Plant Booster system does not need the same treatment. Other than disconnecting the Faucet connector cap from the garden faucet, there is no need to winterize the system. The 1/16th” ID polyurethane tubing simply expands with any frozen water in it, and that does not cause damage to the tubing. You might like to spray some WD40 lubricant on it to protect the galvanized bolt and wingnut from rust. The springs and hinge pin are stainless steel and will not weather.
Absolutely. Many of our customers have been using the Plant Booster system for watering their plants at their remote cottages where there is not “city” water supply.
Using any water source, such as a rain-barrel, or a bucket, the water level of which is above the plants that need to be watered, you can set the system up in exactly the same way as you would at home.
The Plant Booster device reacts to the weight of the plant it serves, and pinches or unpinches accordingly to let water through to maintain weight. Water pressure is therefor effectively irrelevant. The water pressure will only affect how fast the water will flow.
I have set up a system functioning perfectly well with only 1ft of water head (water level 1ft above the outlet of the tube into the plant)
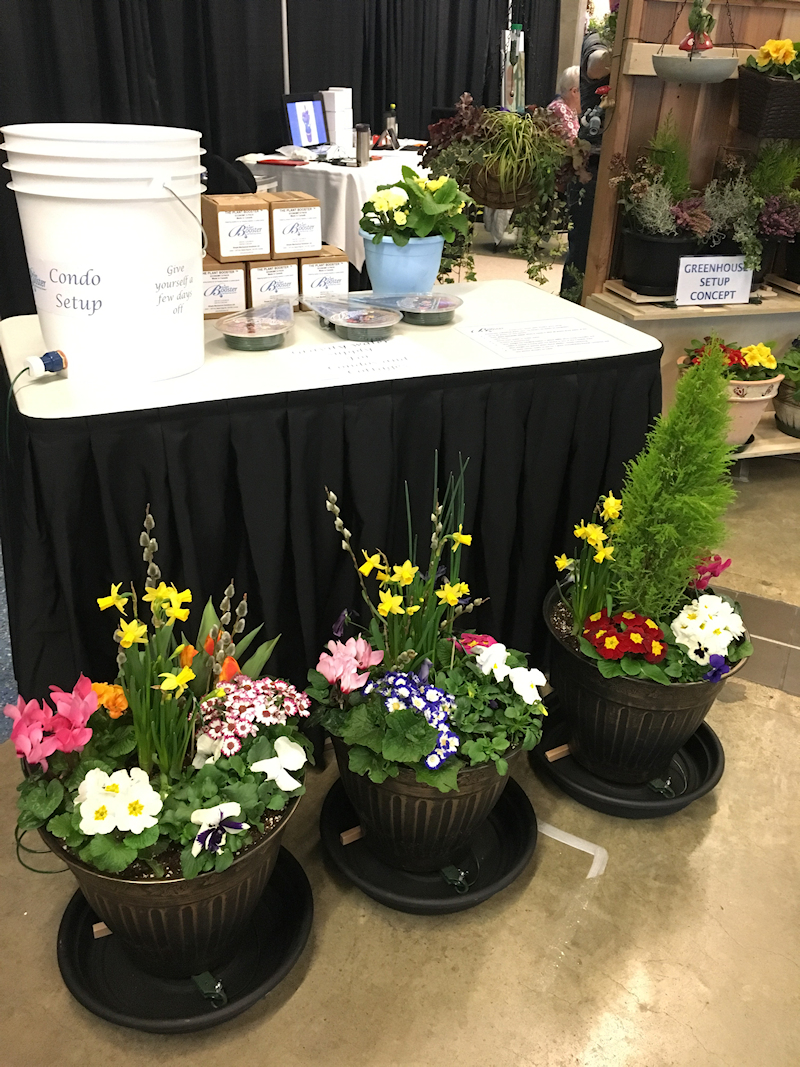
Many of the Condo dwellers I have met mentioned that their balconies don’t have an outside tap. The solution to this is essentially the same as how many of our customers use the Plant Booster system at their remote cottages – by using a gravity fed system.
If you can find a spot on your balcony where you can place a table onto which you can place a rain barrel or bucket with a garden hose spigot, then you are all set. I used the setup below at the BC Home and Garden show in February. I fitted the 20litre bucket with a hose spigot (your local hardware should have the parts, or you can buy a rain-barrel, which comes complete with the spigot), and it drip fed water to the three potted plants for 5 days, consuming only about one third of the volume. On hot summer days with your plants in the full sun, I would expect 20litres to be able to feed three pots like this for three or four days – just long enough to get away for that well deserved long weekend.

Provided the water level in the barrel or bucket remains above the tube outlet into each plant on the system that it serves, you can set up the Plant Booster system in the normal way.
Using a gravity fed system for hanging baskets on your Condo balcony is more tricky however, because you will likely not easily find a spot high enough to place your barrel or bucket to gravity feed water down to your hanging basket. Maybe your upstairs neighbours would oblige? All they would have to do to feed your plants water on your balcony below them would be to keep the barrel or bucket filled while you are away. The Plant Booster will control the flow to each plant as normal.
The new style faucet connector cap pictured below is much more sturdy that the old style with the little pip on it. The old style cap is still useful for lower pressure applications (such as gravity fed setups), but the new style cap provides a much more robust way of connecting the tube.
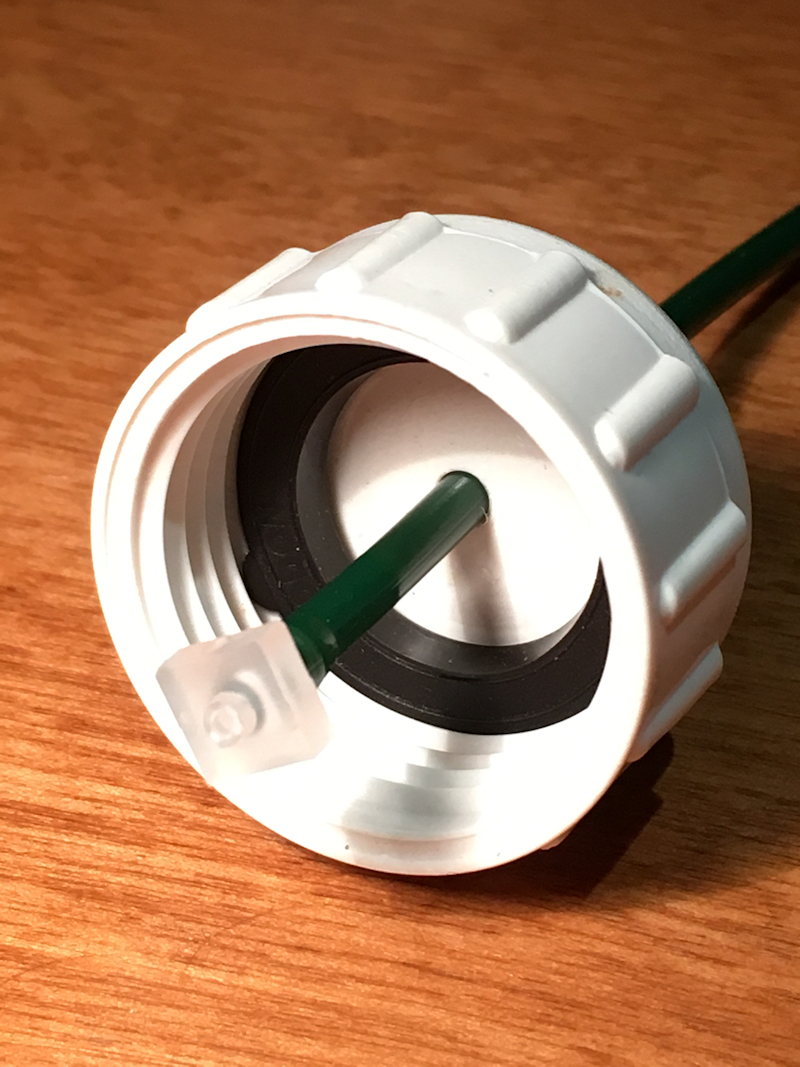
The connect the cap to the tube, feed the tube through the hole in the tube. If you are struggling to get it in, cut the tube at an angle so you can get a start, then use long-nose plyers to pull the tube through. It should be a fairly snug fit.
Using a straight connector barbed fitting to insert into the end of the tube as shown below. The fitting will make the tube wider at the end as it goes over the fitting, and that will make it impossible to go back out through the hole. Pull the tube back and give it a firm tug to seat it nicely in the hole of the cap. Being made of polyurethane, as the tube jams in the hole it will make a very god seal. You don’t absolutely have to but you can trim the other end of the fitting off so that you can still use a strainer if you need one.
A strainer is only generally needed if your water supply contains any entrained grit.


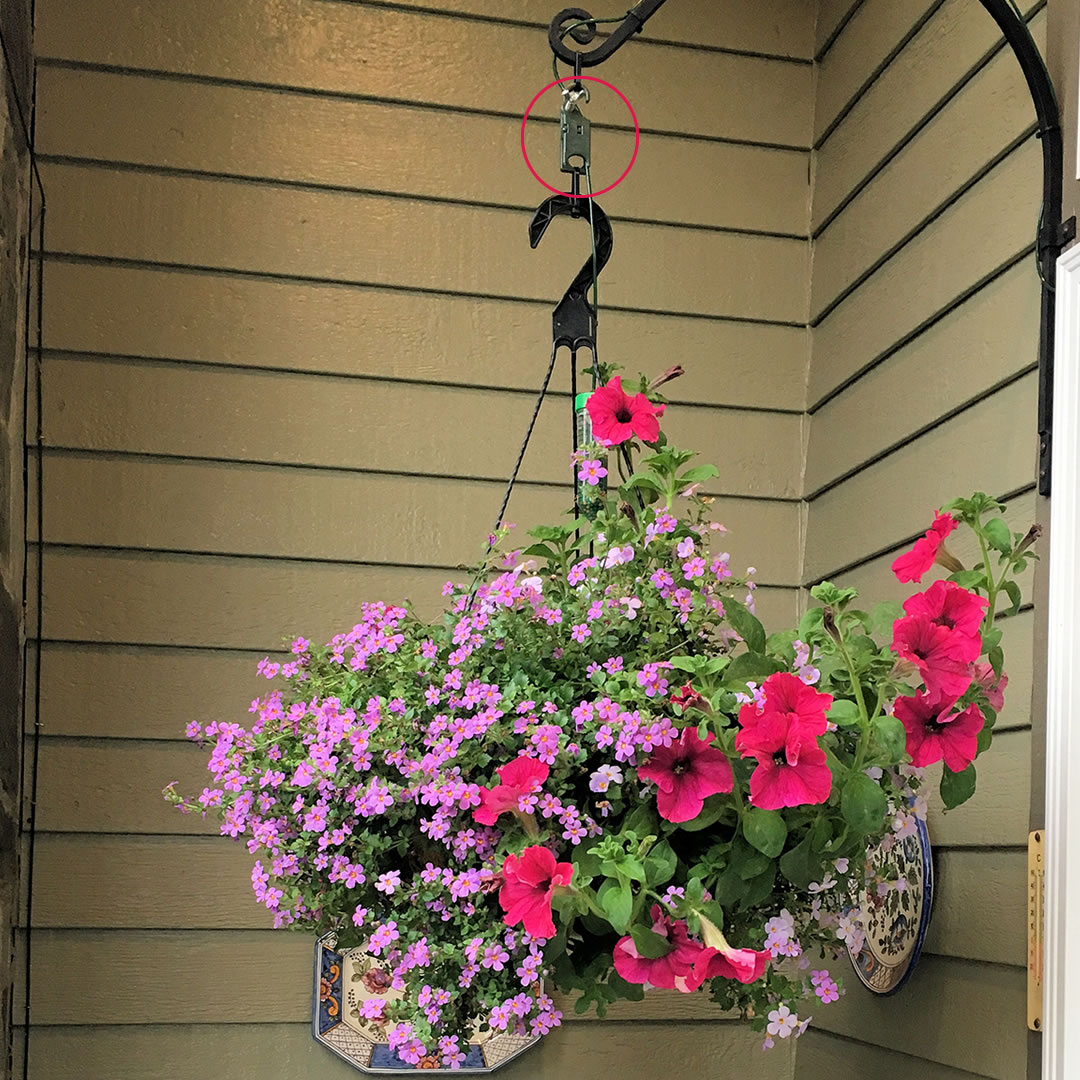
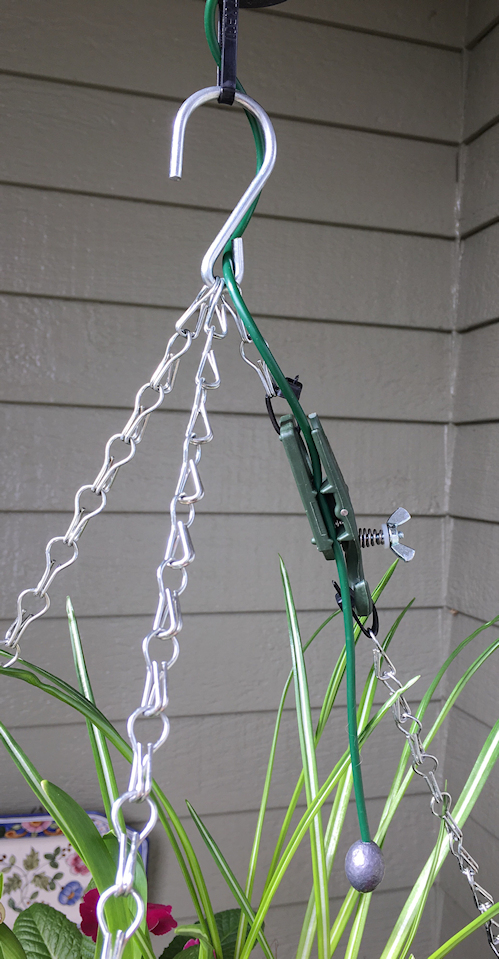
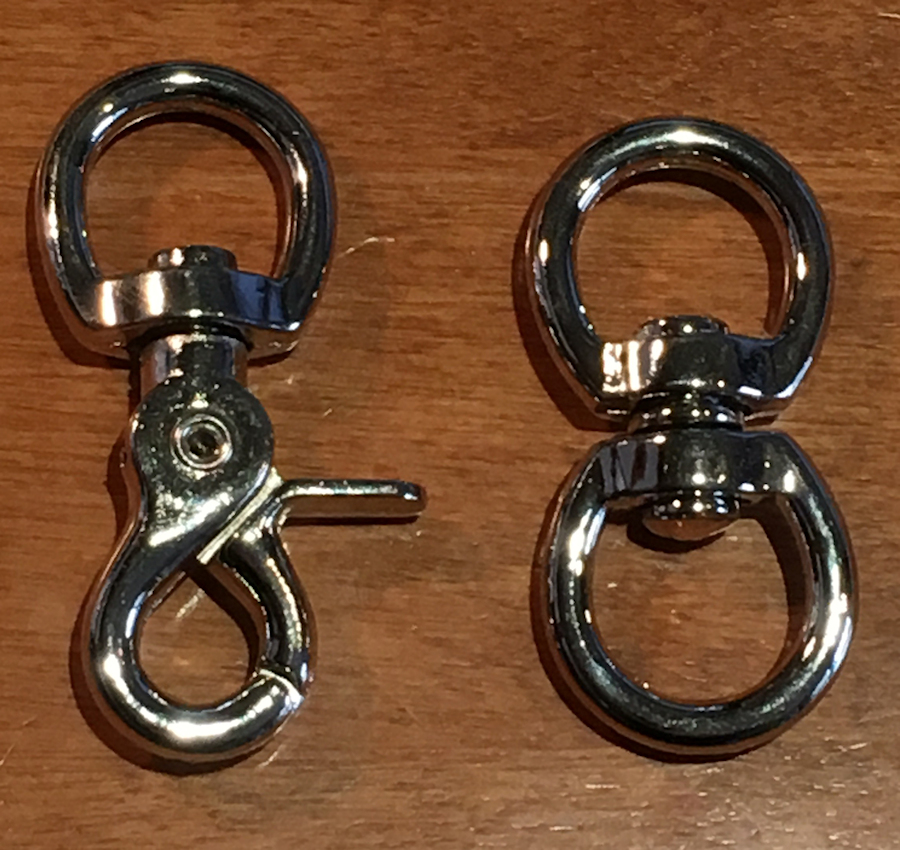
Hanging baskets spinning in the wind can be a real problem, and can result in the device breaking. The tendency to spin often occurs to baskets that are hung on the corner of a building. Two things can happen. The hook of the Plant Booster device can come under excessive strain, and the tube can end up twisted around the hanger as the basket spins. Either issue can lead to a failure of the device, or the tube, or both. If you must hang a basket in a location where the wind will tend to cause it to spin, then this problem can easily be solved by using a tether strap or chain from the basket to the wall to prevent the basket from rotating through more than say 90deg. In addition to prevent the device hook from coming under excessive strain it is recommended to either use cable ties or swivel links such as in the pictures below.
The Max 30 lbs statement on the device is only intended to help when the device is being used for watering a potted plant. As explained in Q9 the maximum weight of a hanging basket where the device will have good control can be 40 or 120 lbs depending on who the device is installed in the hanging basket. As explained in Q10, the maximum weight of a potted plant where the device will still have good control is 207 lbs.
The 10, 20 and 30 lbs marking rings on the device are intended solely to give a guide as to where to rest the edge of a pot as the weight of the pot increases.
As explained in Q10 as the pot’s weight increases, the fulcrum on which the pot rests must be moved in relation to the centre of weight of the pot, such that the weight resting on the Plant Booster device remains within it’s control limits.
If a pot is, say 20 lbs, and the fulcrum of the pot is on the far side of the pot opposite the device, then the fulcrum will carry about 10 lbs, and the device will carry about 10 lbs (the sum adding up to the pot’s weight). Referring to the images below, in this case the edge of the pot should be rested more or less on the ring that says 10lbs. For pots that are heavier, the edge of the pot on the device should be placed closer and closer to the devices’ hinge.
You will know that you have located both the fulcrum and the edge of the pot on the device correctly when you are able to tighten or loosen (as needed) the wing nut such that the device is able to control water flow.
If you find that you have to tighten the wingnut too much to start allowing water through the device, then the edge of the pot is resting too far away from the hinge. Reposition the edge of the pot a little closer to the hinge and try again.
One you have found the right spot, it is recommended that you mark the location of the fulcrum on the pot, and the edge of the pot on the device with a small indelible ink mark.


Pushing the 1/8″ polyurethane tube over the small barbed fittings correctly so that the joint is reliable without breaking them is not easy. It takes some practice, and as recommended in the installation instructions some heat, such as boiling hot water, is helpful to soften the tube end enough to do it. The tube must be pushed all the way as far as it can go up against the end.
If you bend the barbed pip, the fitting should be cut off and a new fitting used. Leaving enough slack in the tubing to make sure trimming a little back is not a problem is VERY important therefor.
Too much heat will cause the tube end to soften permanently, and the joint could then pop off under pressure. With boiling water you cannot overheat the tube.
There is a helpful tool – The Pincher Tool – you can make for yourself to help you grip the tube firmly and keep it straight, and therefor have less risk that you might bend the barbed pip. It is also possible to push the rube over the barb using this tool without first heating the end.
I was reminded of this tool by a family member of the original inventor of the Plant Booster, Al Muxlow. Al used to make these and give them to his friends. It really works like a treat.
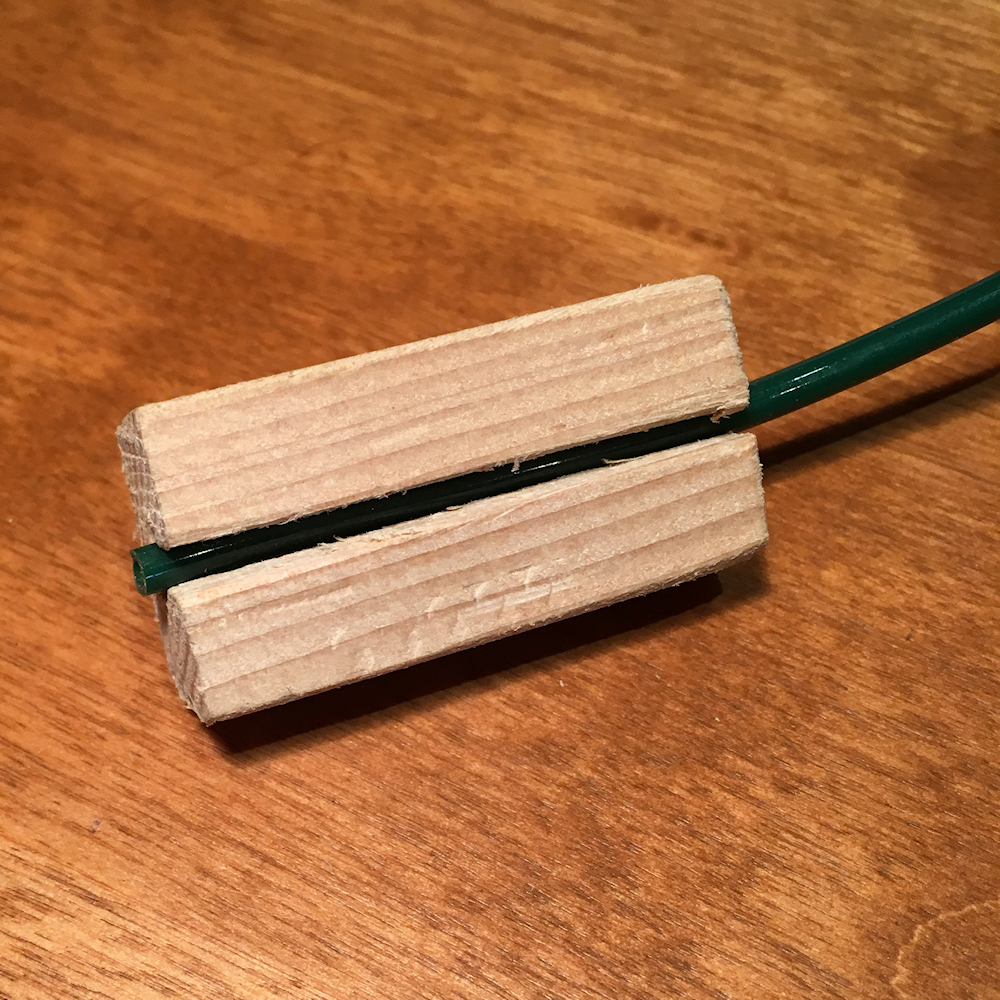
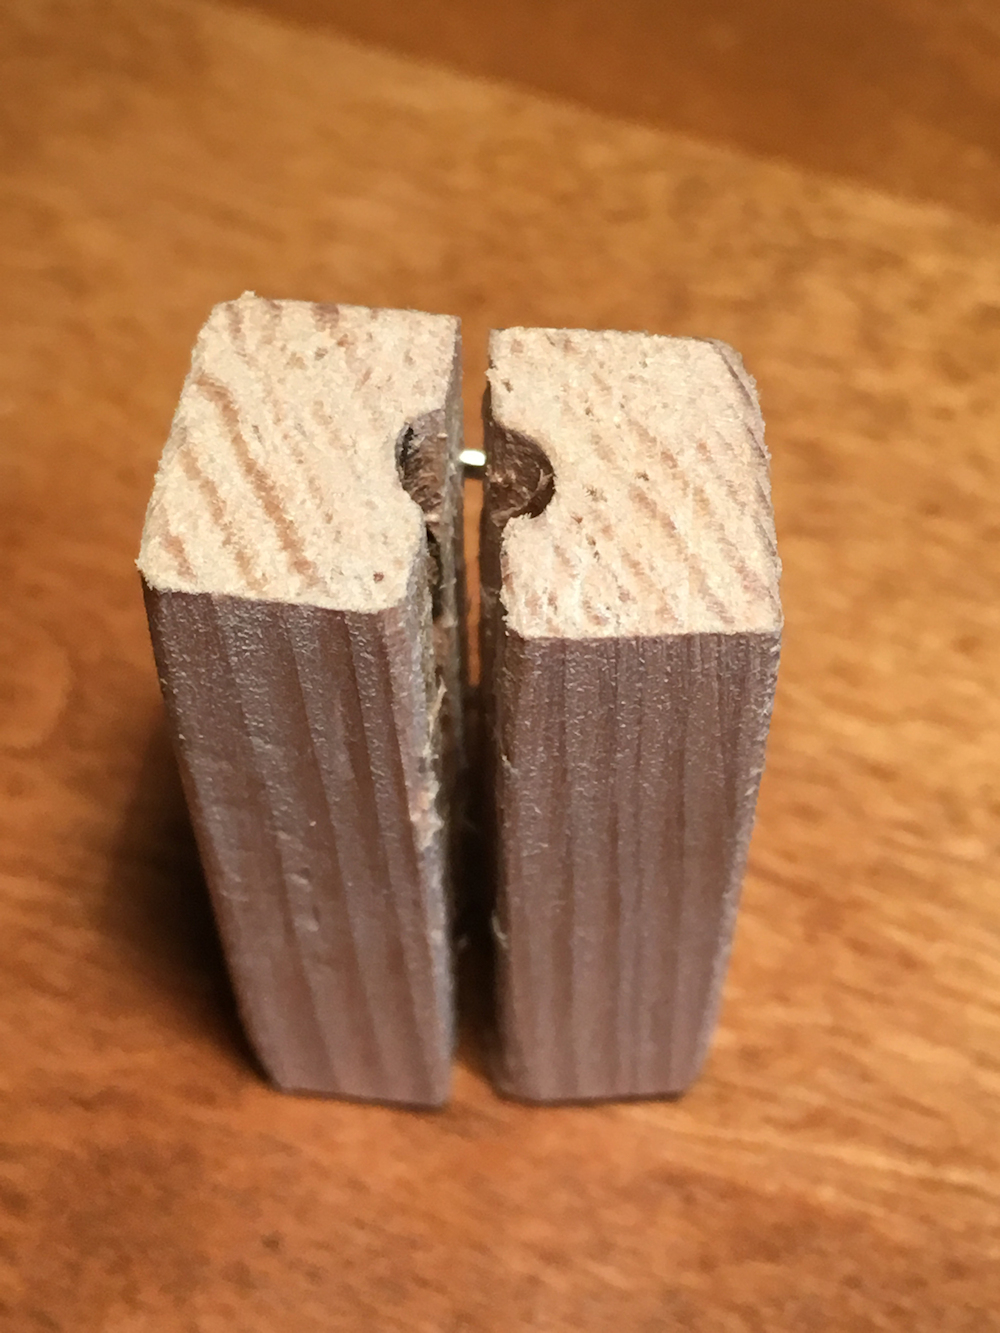
The Pincher tool pictured below was made from a block of oak 1/2″ x 3/4″ x 1.5″. It was an off-cut of the same wood used to make fulcrum blocks.
A 1/8″ hole (same as the tube OD) was drilled down the center and on one end a slightly larger drill was used to drill a little more than the length of a barb of a fitting to create a sort of flared effect.
The block was then cut in half using a hacksaw right down the center of the hole. You will notice from the pictures that the finish of the wood is quite rough. That is OK, it all adds to the grip.
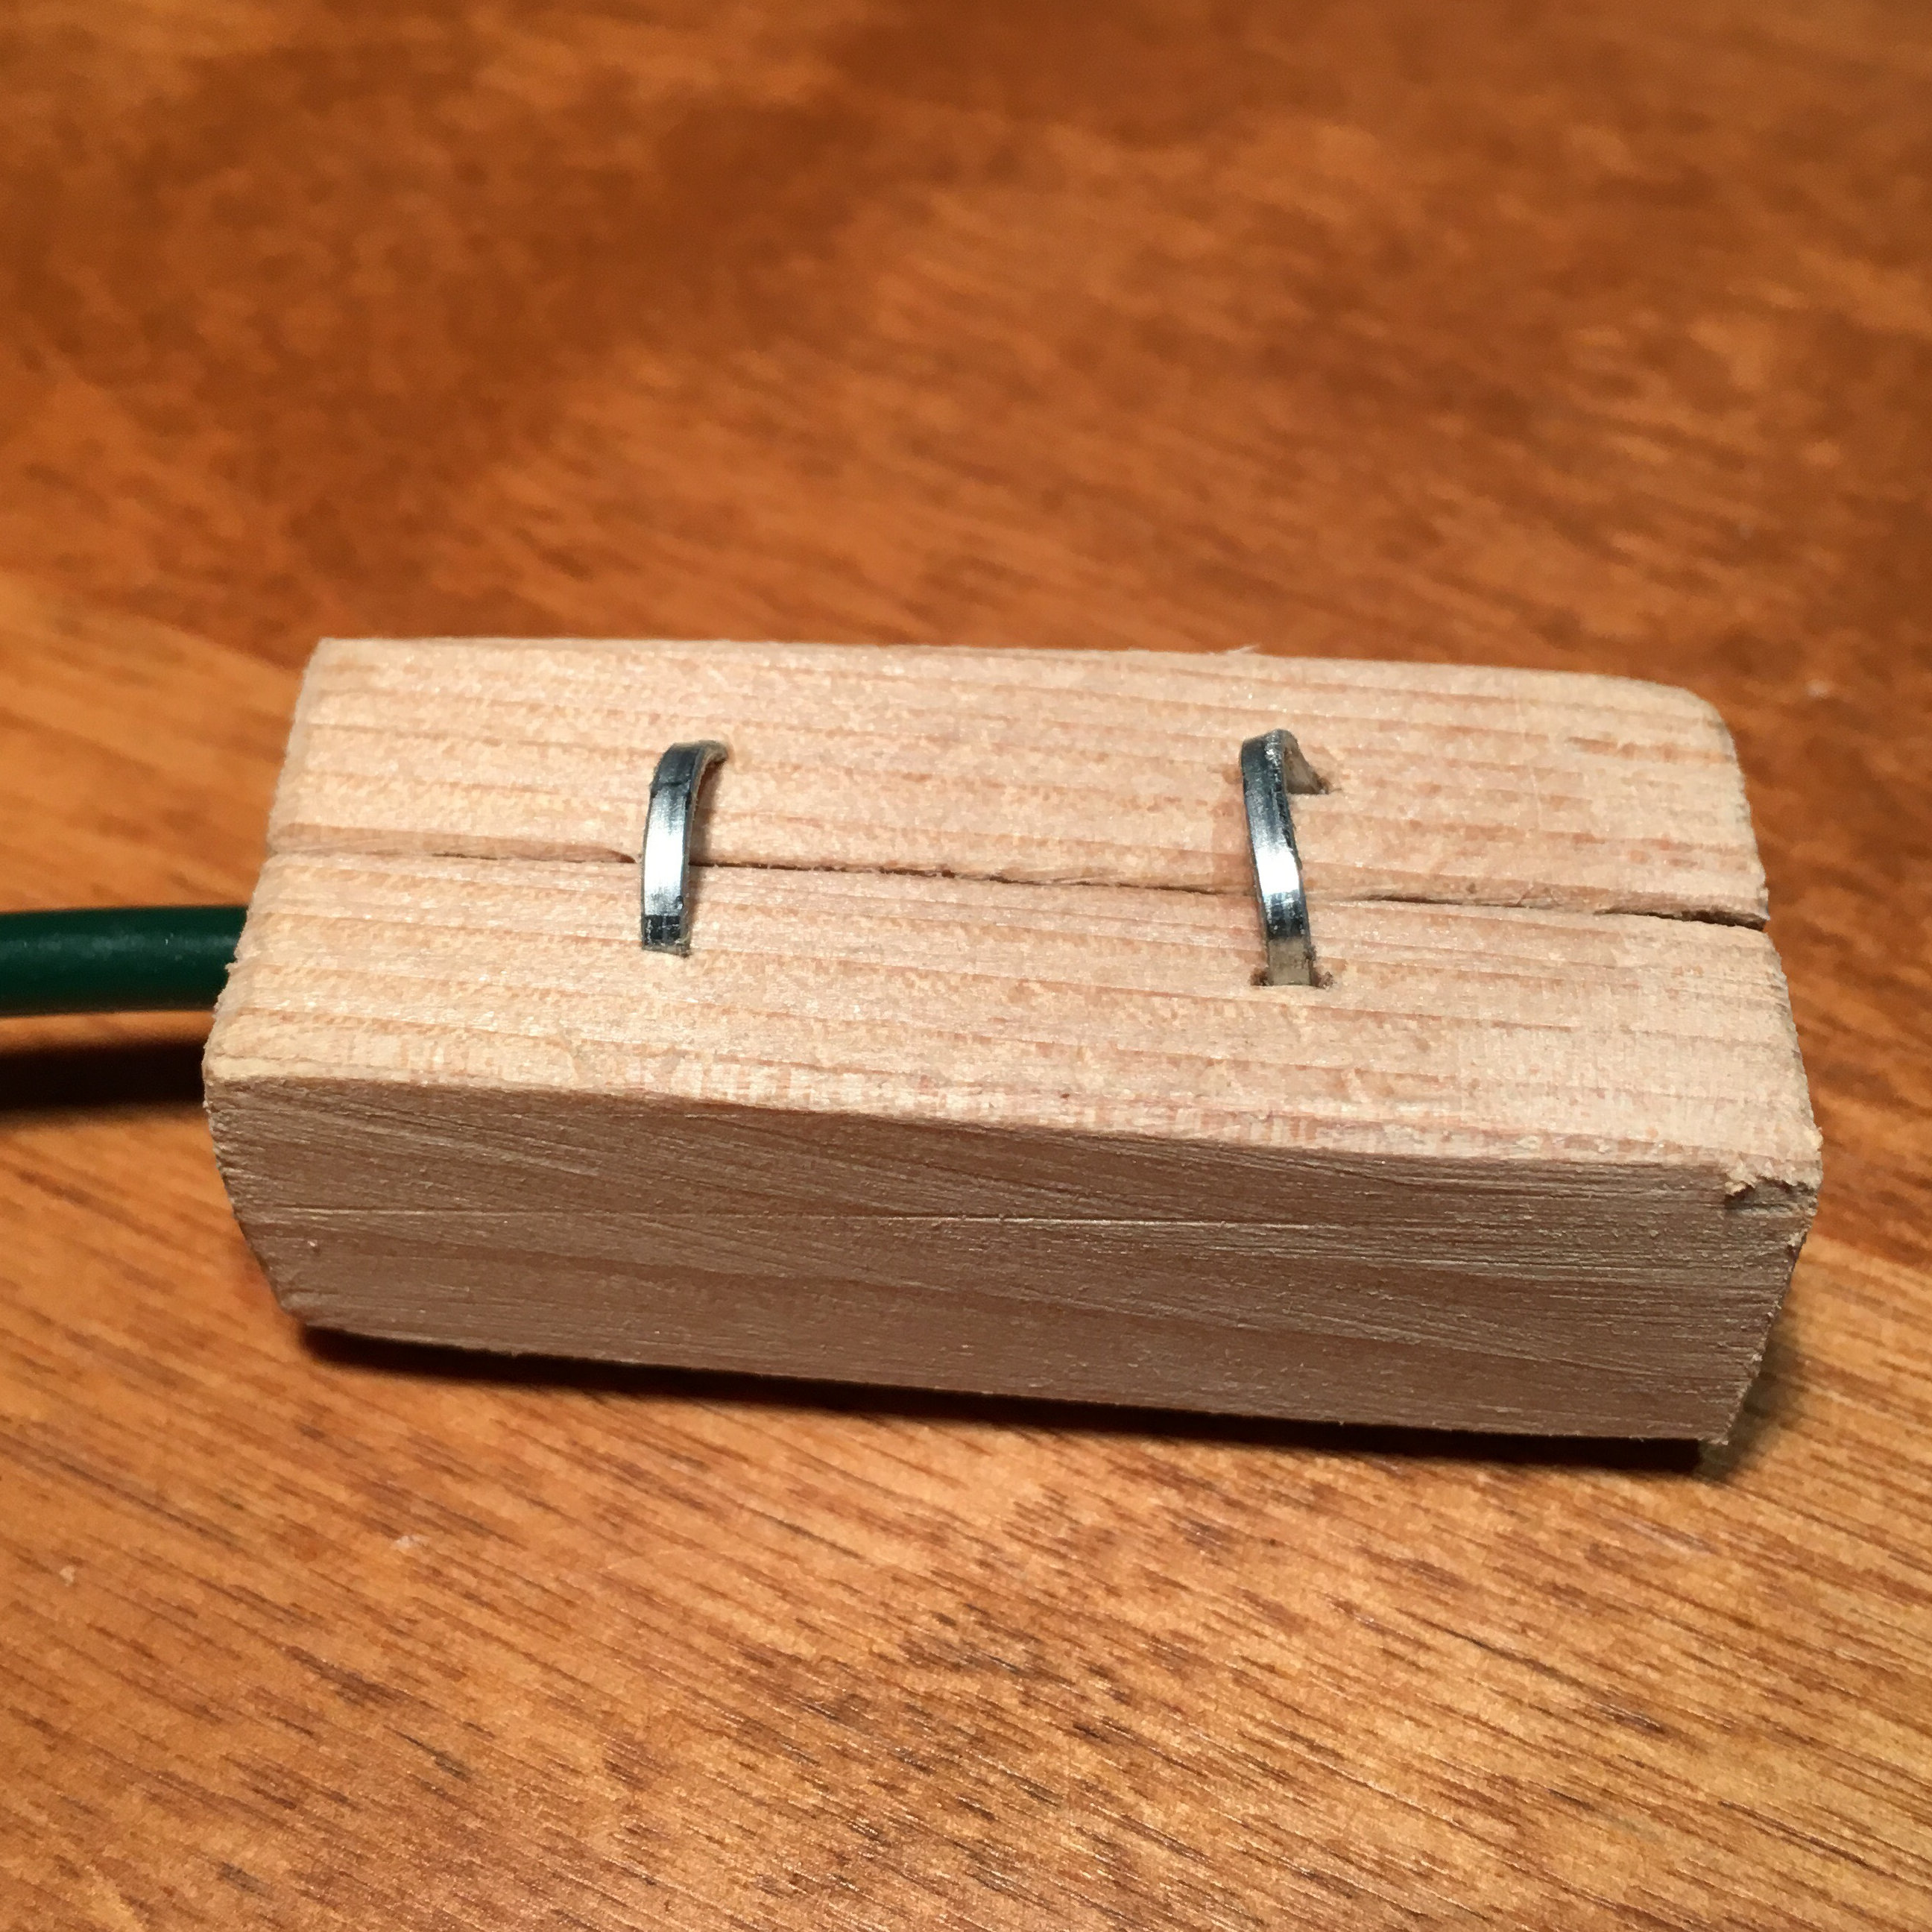
Using a staple gun two staples were shot into the block to hold the two halves together, but also to act as a sort of sprung hinge. The idea is that the two halves can be flexed apart to go over the tube (which rests in the groove of the drilled hole), and by pinching the two halves together the tube can be firmly gripped. The size of the block allows you to hold the tube straight, and thus allowing you to firmly push the tube over the barb with much less risk of breaking the small barbed fitting.
It is simple, but effective.
The video describes how to use it.
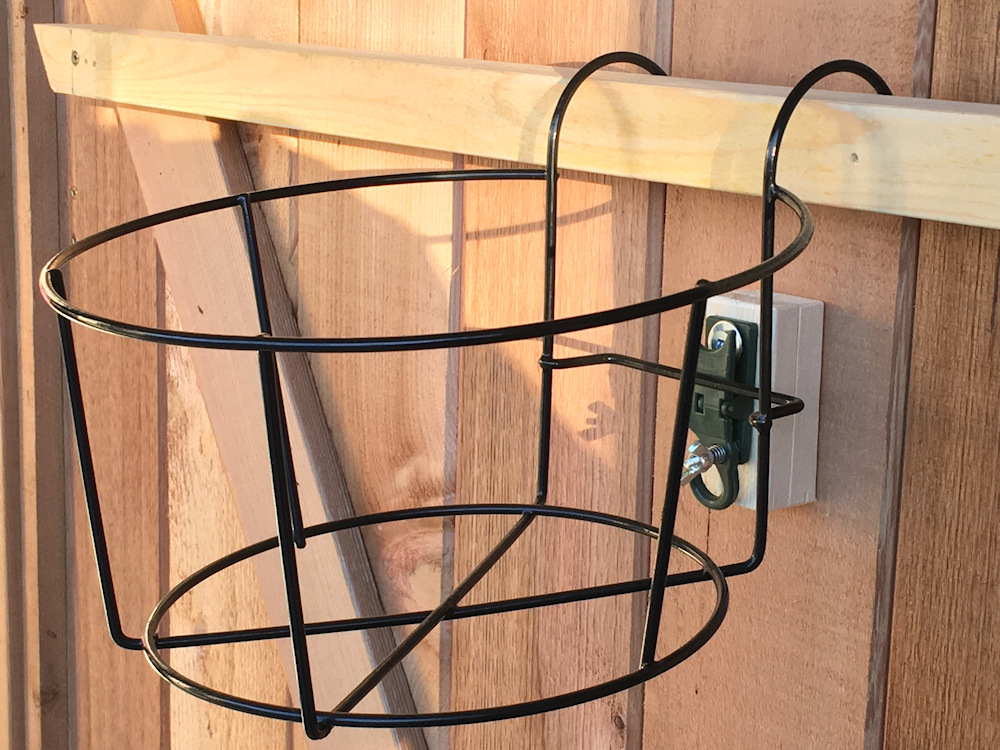
A fence planter installation is like a potted plant installation on its side.
The weight of the plant swinging from its hanger at the top back towards the device is enough to let the device sense the weight of the plant.
A way to locate the device on the wall needs to be found. It could be attached to the planter, or attached to the wall – either way it will be pinched between the two.
The pictures below illustrate this.


When adjusting the setting of the Plant Booster device for the first time, how do you know what weight it should be set for?
It is very important to water the container plant manually by hand first to establish the properly watered weight. For hanging baskets, water the basket until it drips and then leave it to hang until the dripping stops. This may take some time, perhaps a few hours, and it depends on how well draining the soil is that has been used for the basket, as well as the ability for excess water to drain out. Make sure that your basket can drain properly.
At this point the soil in the container is still moist, but not overly wet.
Importantly, all the soil will still be moist, and not just a surface layer.
At this point, when the basket is no longer dripping, adjust the wingnut until it just does not drip water in. Any evaporation of water from the basket now will result in a weight loss, and thus cause te device to allow water in to re-establish the set weight.
If you adjust the Plant Booster device too soon (before it has completely stopped dripping), the device will from that point on work to maintain that weight, including the dripping.
If you have a dripping basket, just loosen the wingnut a quarter turn, and leave it to settle down for a day or so. If it is still dripping, loosen the wingnut another quarter turn, and so on. At some point you will find the right setting.
The Plant Booster device reacts to the weight of the container it has been set to control to.
The device cannot distinguish between what weight is the plant, or the weight of the soil in the container. It only sees the sum of the two.
At the beginning of the season, when the plant is small, less weight is in the plant, and as it grows, more weight is in the plant. The Plant Booster will maintain the overall weight, so as the plant becomes heavier, the soil will start to become drier (and therefor lighter) to maintain the overall weight as the same. Normally you can expect this to happen very slowly, like over the spoace of a month or so.
On your regular rounds to tend to your plants, say once a week or so, trimming and dead-heading as necessary, and checking water will drip when the container becomes lighter (gently lift by hand), also check with your finger that the soil still feels moist. You will need to check deeper than the surface, say an inch or so or deeper, and decide whether you should adjust the Plant Booster device for a slightly heavier setting. Tighten the wingnut a quarter turn, and let the water drip in. It will stop dripping once the container has reached its new set weight. Then repeat the process some time later.
Some plants, due to their hardiness or tollerance for a fairly broad range of soil moisture content, may not need any adjustment troughout the season.
The Plant Booster self watering system will look after watering your plant, but looking after the plant, dead-heading, trimming and adding in fertilizer to your container plant during the season will boost the plant’s performance.
If your containers don’t have slow release fertilizer already added into the soil of the container, using a fertilizer tube to add it in is an easy way to do it.
The way it works is that water drips into the fertilizer tube when the plant becomes lighter, the tube fills up with water, flooding the slow release fertilizer, and then overflowing through the inner tube into the plant. This way with every drop going into the plant will contain some dissolved fertilizer.
The fertilizer tube that can be bought as an accessory can be set up as follows:
It is hard to say how long the fertilizer lasts because that depends on the fertilizer used, temperature, and the water drip rate, but using a Ozmocote Koch Polyon slow release fertilizer like an 18-6-12, or 16-6-12, I have noticed a significant improvement in the plant’s performance for a period of several months.
Note that because of the way the Plant Booster system works, basically everything dripped into the plant stays in the plant because unlike conventional systems, the plant only gets as much water as it needs, not to the point where excess water drips out (taking nutrients with it)
For best effect I recommend changing out the fertilizer every 8 to 12 weeks. Occasionally adding in a supplementary shot of a liquid fertilizer like Miracle-Gro won’t hurt either.
Filling the fertilizer into the fertilizer tube is described in the instructions below.
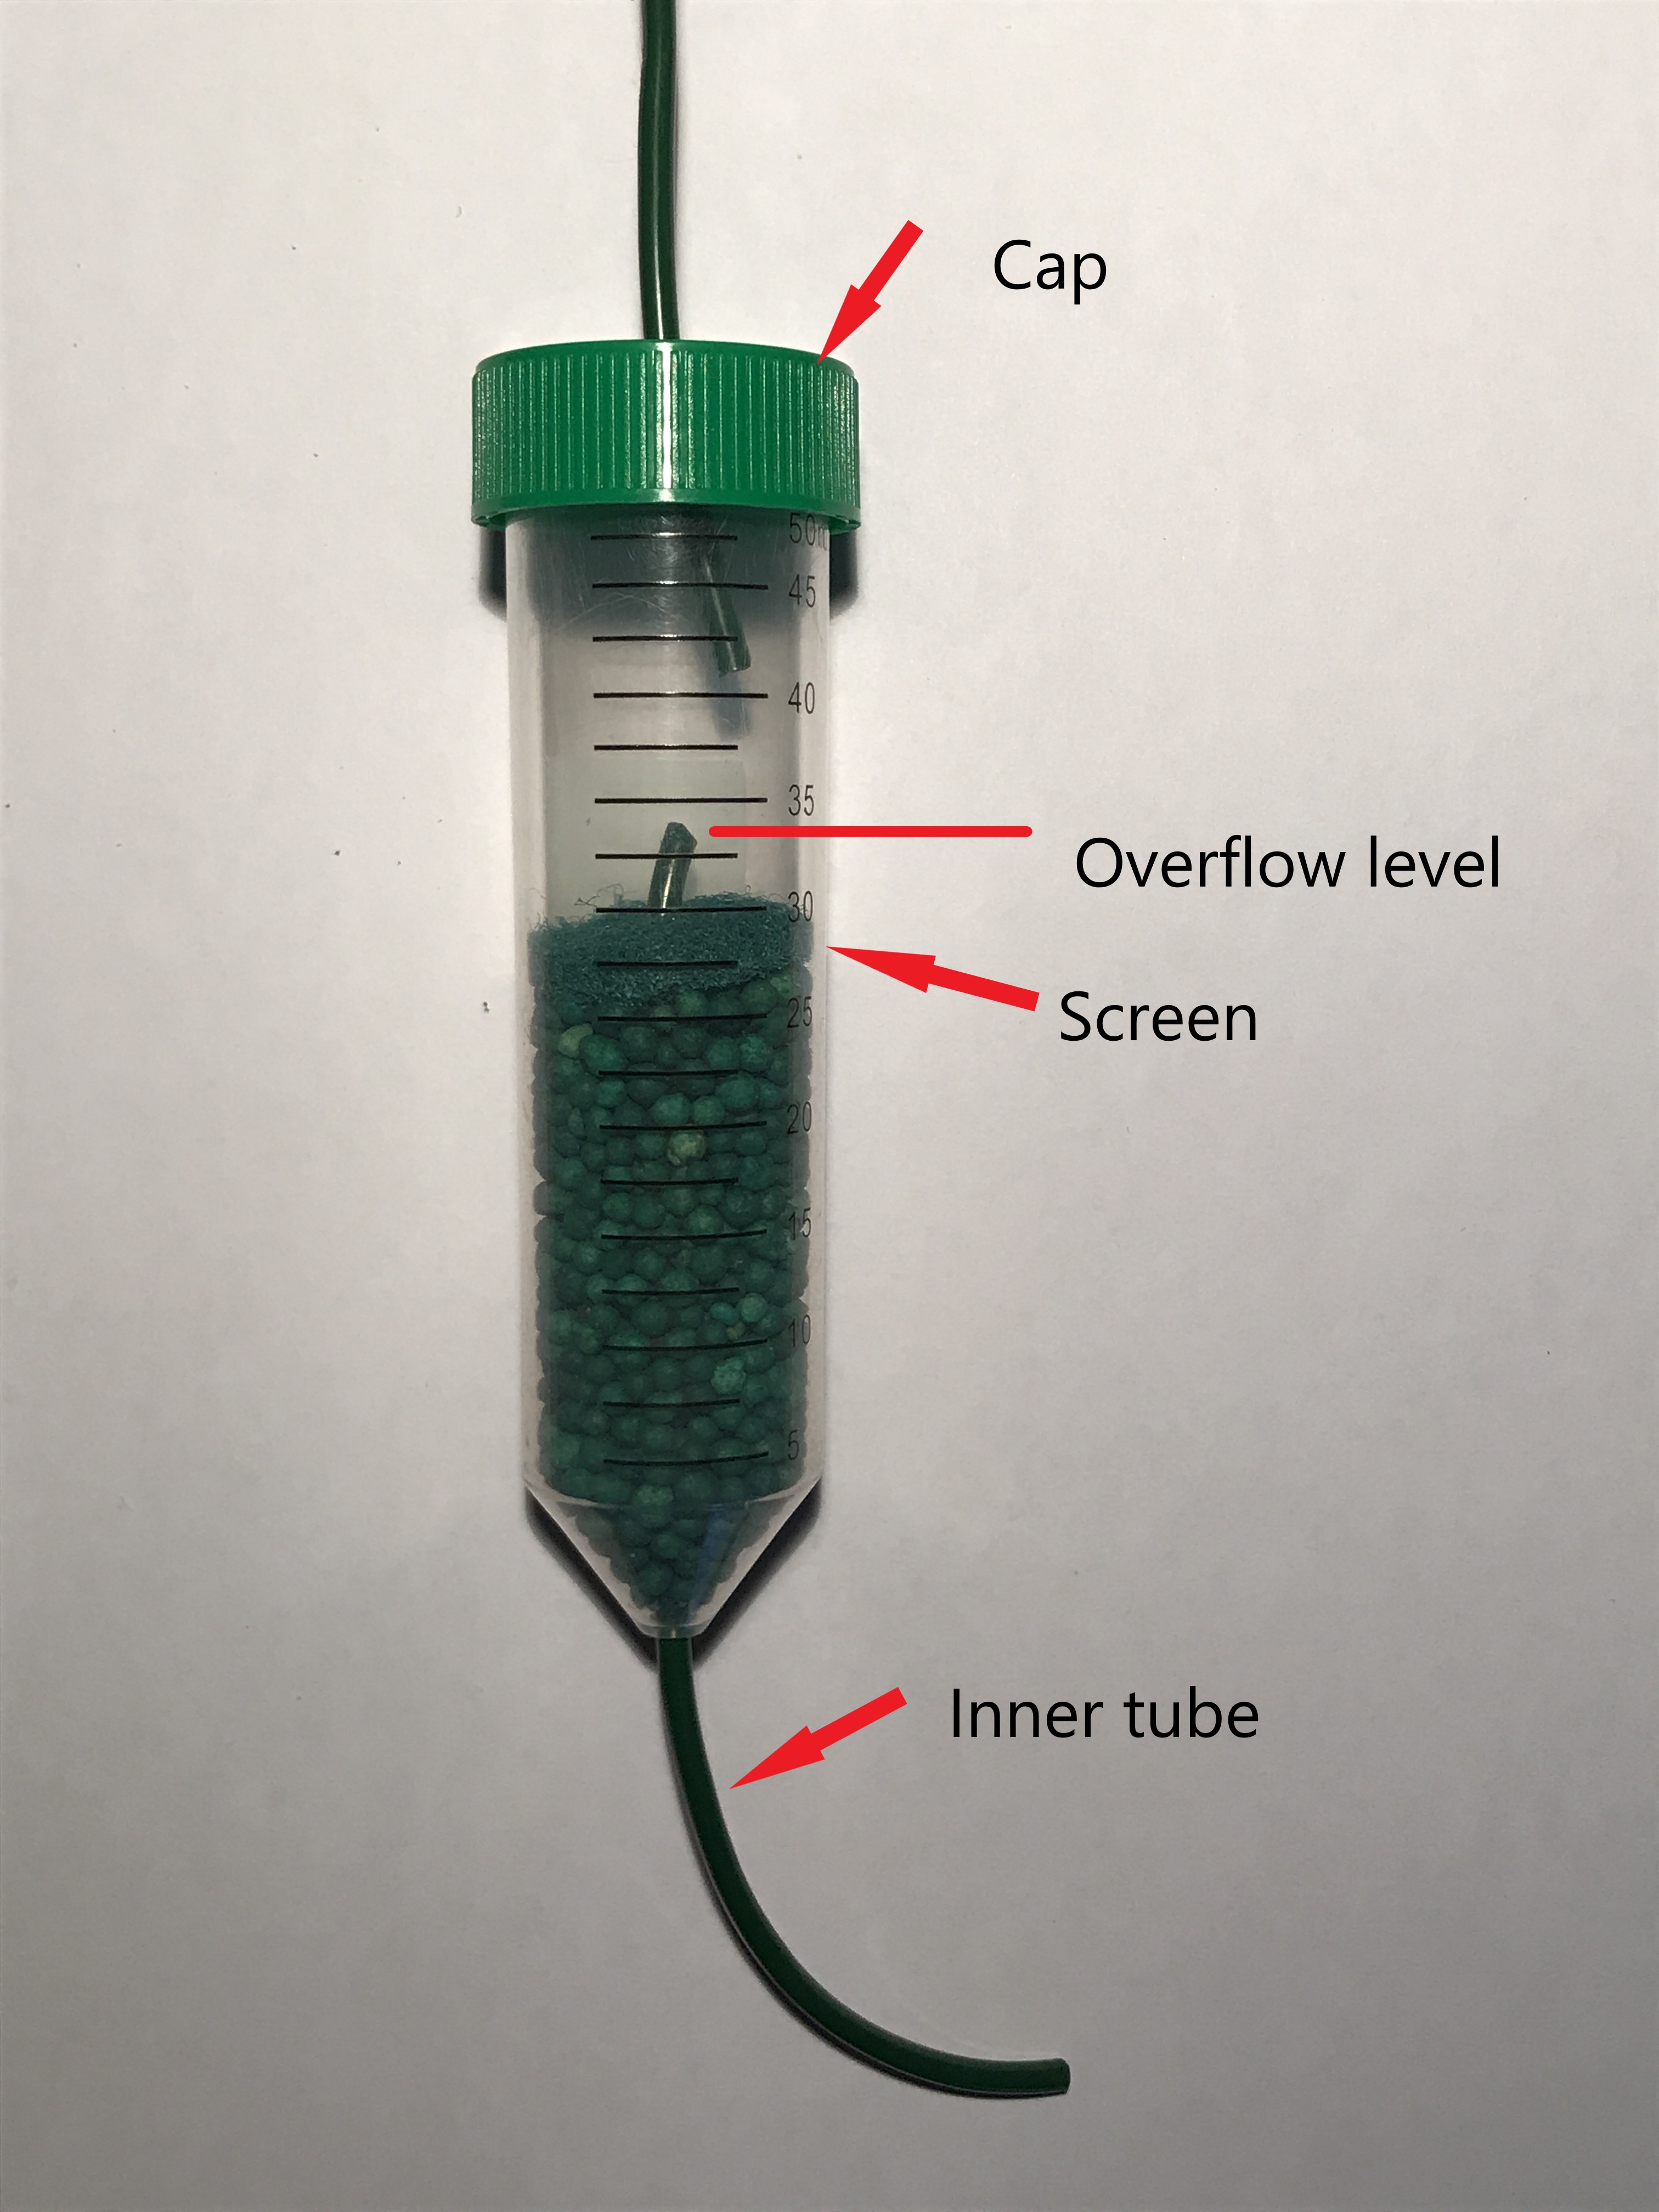
- The fertilizer tube consists of three parts
The fertilizer tube (test tube),
Fertilizer screen, and
Inner tube
- Start by taking the cap off the fertilizer tube and pulling the inner tube up and out a bit of the top just enough so that the screen can be pulled to the side to allow you to fill the fertilizer tube with slow release fertilizer balls. Using a pair of long-nose may make it easier to reach into the fertilizer tube to pull it out a bit.
Note: Take care not to pull the inner tube right out from the bottom of the fertilizer tube.

- Fill the fertilizer tube with slow release fertilizer to about the 30 mark. Depending on the brand of slow release you are using, the fertilizer will slowly release into the water over the period of about 8 weeks to 4 months.
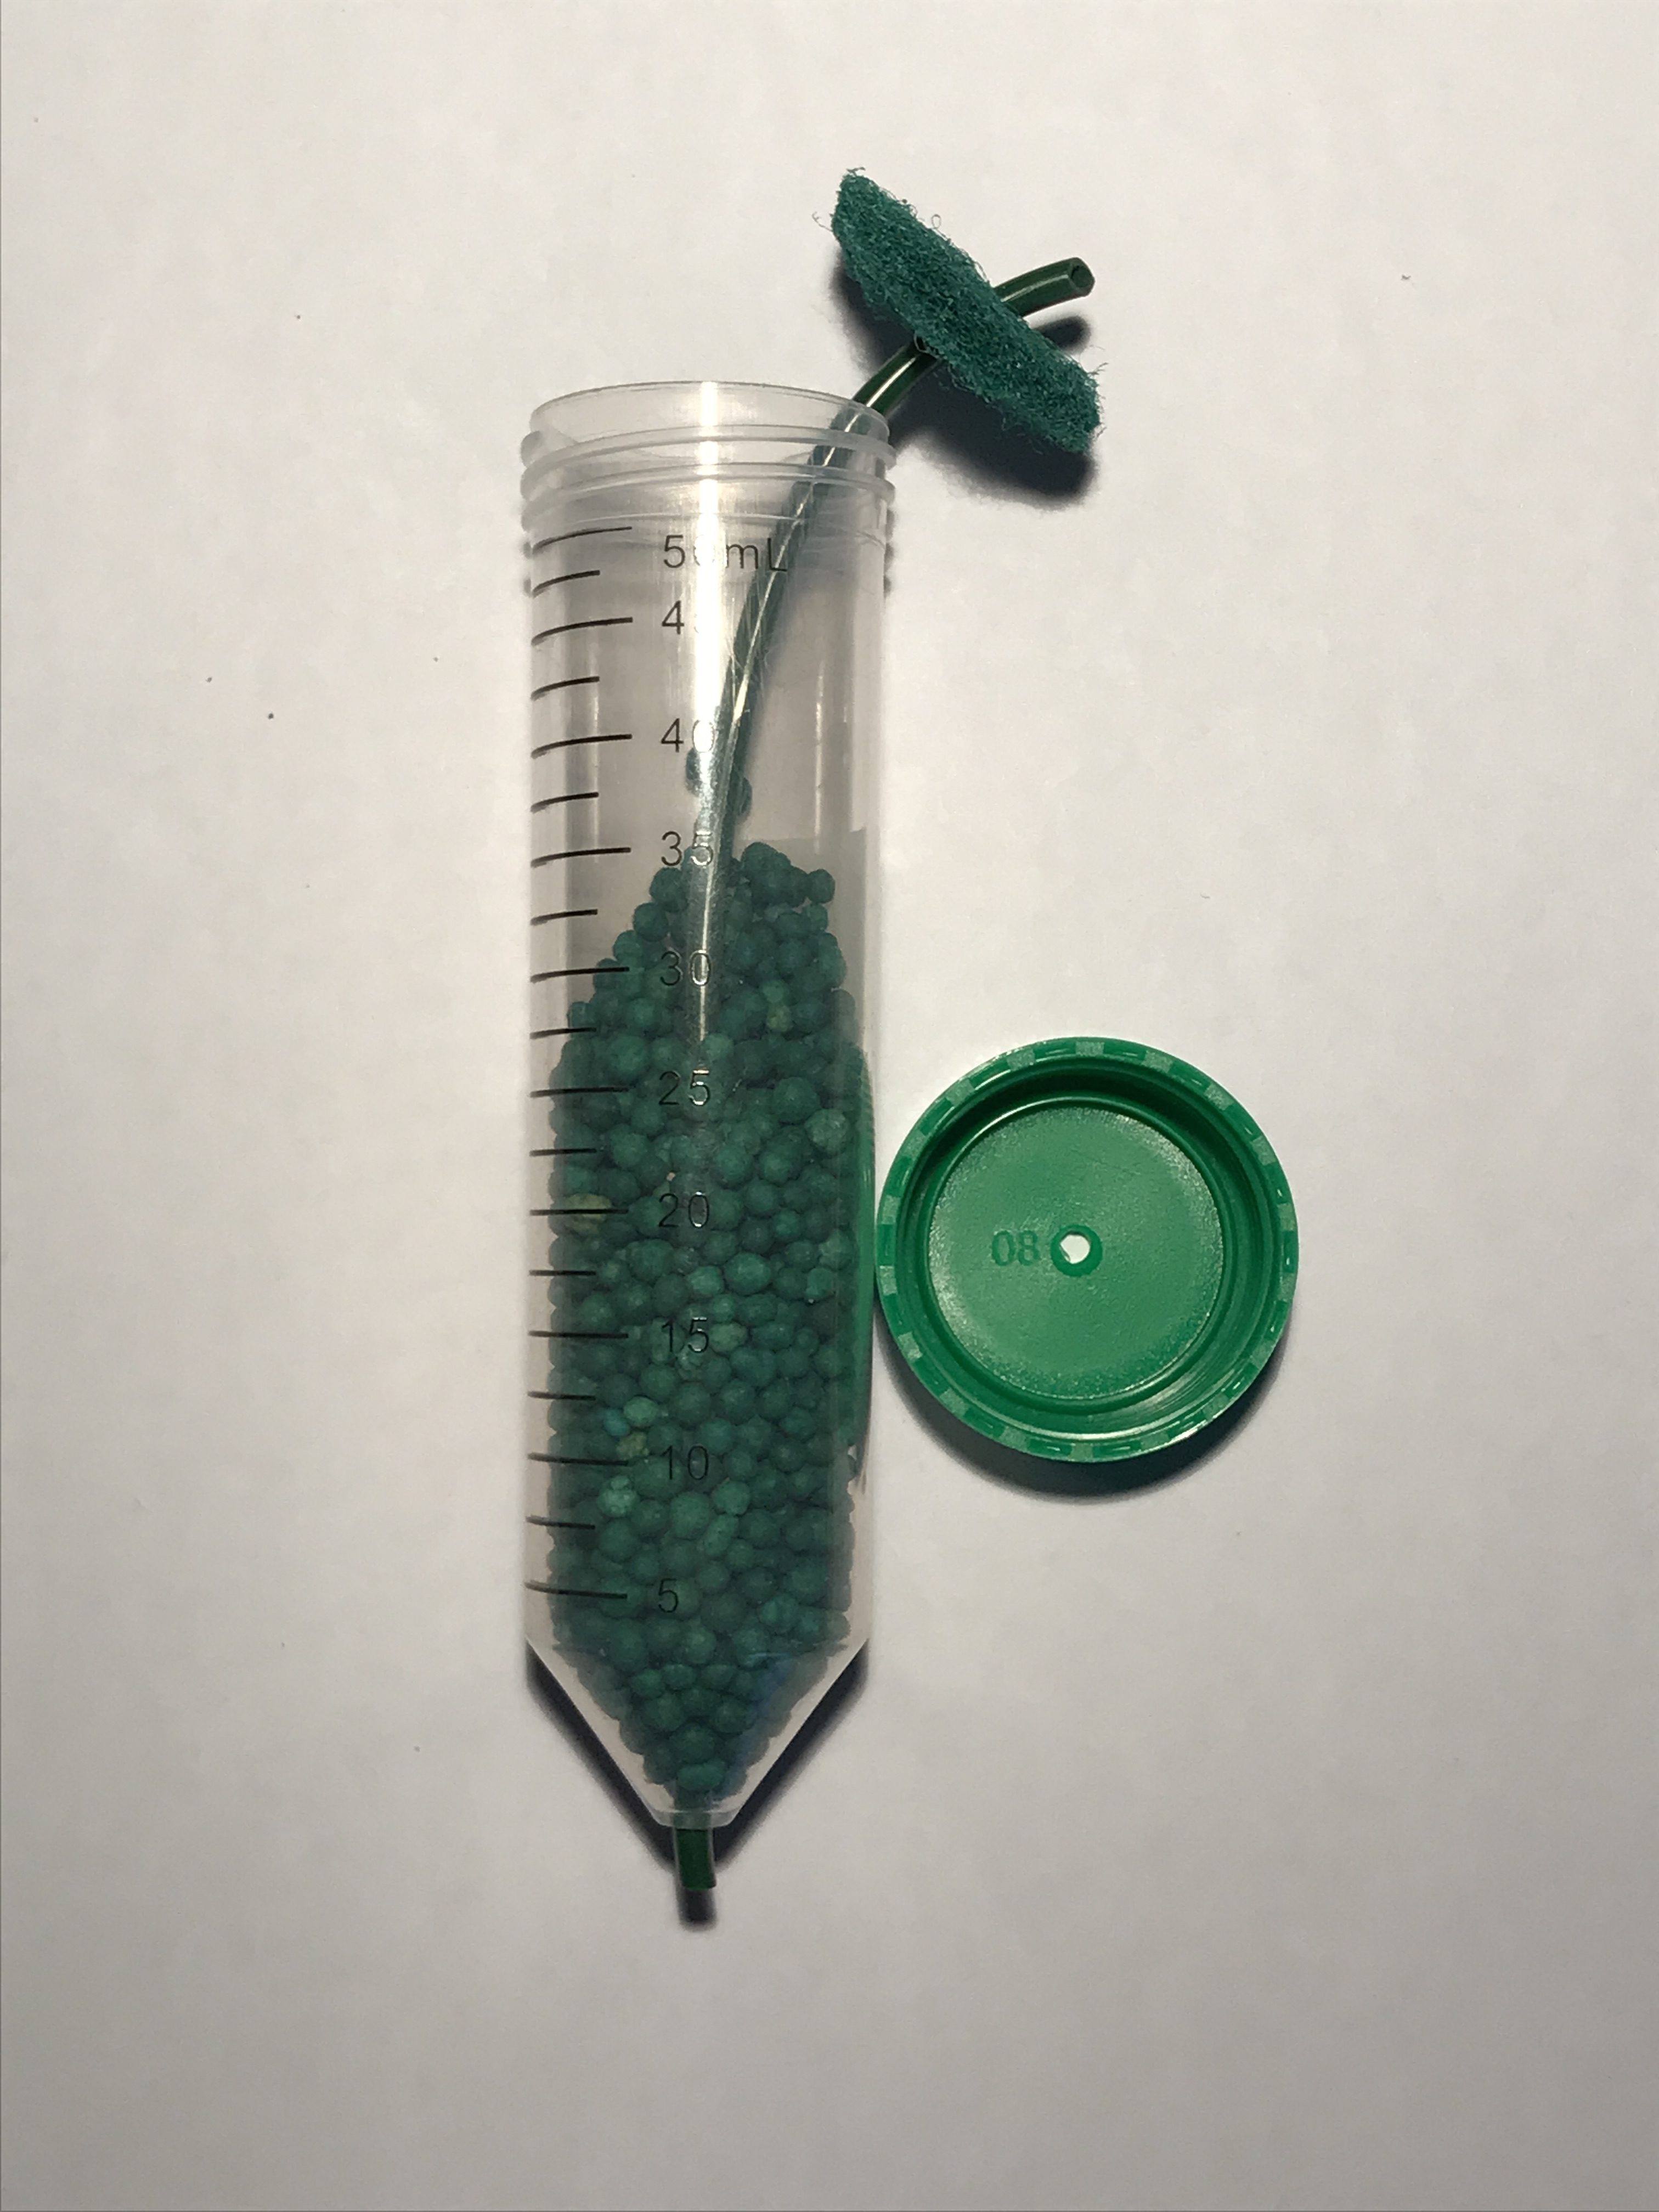
- Pull the inner tube back down, as well as the screen, and tamp it down on top of the slow release fertilizer. The Inner tube should protrude through the screen by about ¼” to ½”. The purpose of the screen is to stop the slow release fertilizer balls from floating on the water surface.

- Replace the cap snugly onto the fertilizer tube.
- Hang the fertilizer tube into your plant. The hole in the fertilizer tube cap is sized to fit over the green tubing snugly.
Note: You may hang the fertilizer tube as high or as low as you prefer. It is probably best that the fertilized drops coming out do not fall onto the leaves, but directly onto the soil in the basket, so hanging it lower will achieve this. The fact that the tube curls a bit coming out of the fertilizer tube is not a problem, and in any case won’t be visible as it is hanging inside the plant.
Tip: It may help to cut the green tubing tip at an angle to make pushing it through the hole in the cap easier. - Squeeze the hook end of the Plant Booster device a bit to purposely allow water to flow into the fertilizer tube to start filling it. It will take some time, and maybe some tapping encouragement to get the water fill the holes between the fertilizer balls. Any remaining air bubbles will eventually find its way out, so don’t stress about that too much.
- Assuming that you have make no adjustments to the wingnut on the Plant Booster device, the basket will call for water as it needs it. The water will fill the fertilizer tube, mix with the water in the tube in which the fertilizer has been releasing, then over-flow into the inner tube, and into the plant. The water level in the fertilizer feed tube should be static at the top of the inner tube protruding above the screen. From this point on, as a drop falls into fertilizer feed tube, a corresponding drop will overflow and fall into the basket.
Note: The fertilizer balls do not dissolve, so much as empty their contents slowly over time into the surrounding water and become depleted. After a period, the ball will be filled with plain water. The “Ozmocote” coating on the balls keeps the balls intact even though they are depleted Unless you knew that the fertilizer balls had been there for a while you can not see by looking at them that they are depleted. - While it is easiest to use the fertilizer feed tube in hanging baskets, by using a support as pictured below it is possible to use it on planters as well.
While the 1/8″ Polyurethane tubing is treated to be UV resistant, ultimately the UV in sunlight will cause the tube to deteriorate. The first signs of deterioration will be tiny pinholes. It is impossible to say how long exactly the polyurethane tubing will last, and it does unfortunately vary with the degree of exposure, but longevity of 12 months, and even up to 5 years has been experienced. The key to longevity is limiting sunlight exposure to a minimum. The 1/8″ tubing is, being flexible and small, easy to hide inside and behind vinyl sidings, or under roof eves, and even buried for runs between the house and the shed, say.
Polyethylene tubing, like the 1/4″ tubing typically used in drip and spray irrigation systems by a number of suppliers, tends to have a superior UV resistance than polyurethane. Therefor if there are particularly exposed runs where exposure to sunlight cannot reasonably be avoided, it is recommended to run this part of the route in 1/4″ polyethylene tubing and reducing up to it, and/or down from it using the available 1/4″ x 1/8″ reducers. There is no harm, or change to the way the Plant Booster system works, if the reticulation system includes a mix of tubing sizes. Because the water flow rates are very slow, pressure drop is basically negligible, and therefor not an issue.
The picture below illustrates an installation on a local restaurant patio, where the 1/4″ x 1/8″ reducer can clearly be seen just before the Plant Booster device.
This is also the recommended approach at commercial installations, where existing systems irrigation that are being upgraded to Plant Booster watering management typically already have 1/4″ tubing installed.
For retrofits, there is a double benefit in that the existing tubing need not have to be removed, but only has to be checked for leak-tightness.

Boston Pizza Mission