Follow the Drip Irrigation System Installation Instructions for best results.
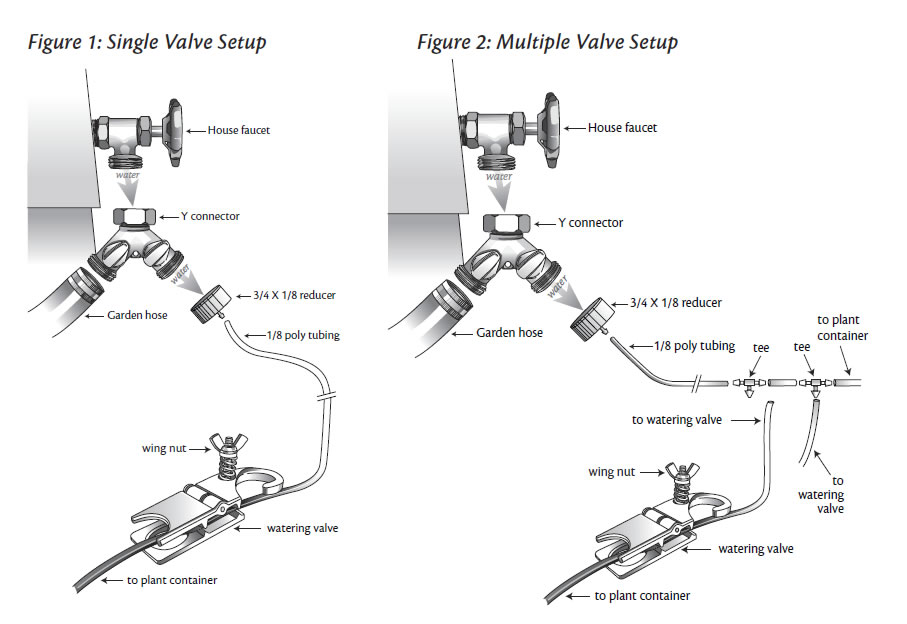
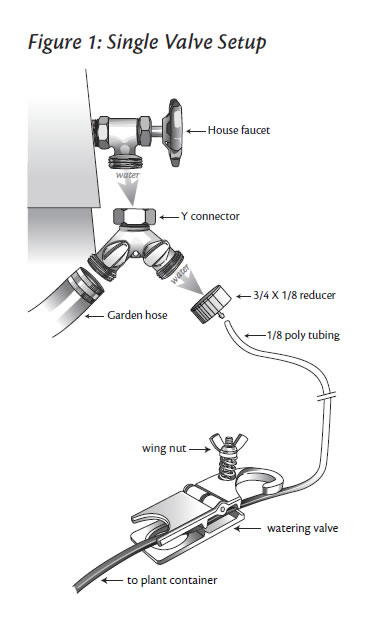
1. Start by connecting the 3/4 x 1/8” faucet reducer to the 1/8” tubing, and screw the faucet reducer onto a garden faucet. Note: If a clean water supply is not available you will need to use an in-line water filter/strainer from a local building supply center. Tip: give the 1/8” tubing a good tug so it seats snugly in the faucet cap to ensure a good seal where the tube leaves the cap. (See Fig 1).
2. Warm the end of the tube in hot water briefly to make sliding it over the barbed connector fittings easier.
3. Run the tubing to the furthest container location, neatly supporting the tubing under the siding joints, corner trim and soffit trim. On wood surfaces, use a wire
stapler. The tubing may also be buried in the ground. Caution - Be careful not to pinch or damage the tubing when stapling or running it around corners and sharp edges. Use a nail to staple onto (so that the staple stays proud of the surface) about every foot or so and then thread the tubing through the staples afterwards. To avoid stapling into the tubing, do not staple directly over the tubing. The above run to the furthest container can be considered as the main line, with branch lines to each container plant or group of containers along the main line route.
4. With a pair of scissors, cut the tube where you wish to tee off and insert the tee by simply pushing the tubing over the barbed ends of the tee. Use hot water to soften the tube ends so they easily slide over the barb. Repeat this process for each container. Since each plant will only be demanding at a slow drip rate, and not all plants at the same time, the 1/8" supply tubing will water for up to 40 containers.
5. NOTE: The polyurethane tubing, although UV stabilized, will nevertheless deteriorate in direct sunlight and pinholes may appear depending on how exposed the tube has been. To avoid premature deterioration, hide the tubing from sunlight wherever possible and practical behind the siding or under eves, but where you have a route where direct sunlight cannot be avoided, consider using 1/4” Polyethylene tubing readily available from your local irrigation materials supplier. Using 1/4 x 1/8” reducer barbed fitting connectors, available from Simple Mechanical Solutions Ltd, tubing along your distribution route can be both stepped up to 1/4” and down to 1/8” as required. This change in line diameter will not affect the operation of the system at all because flow rates in the line are very low.
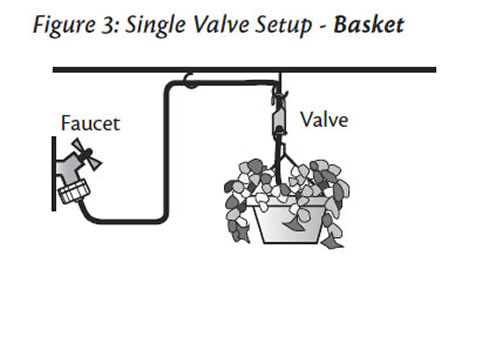
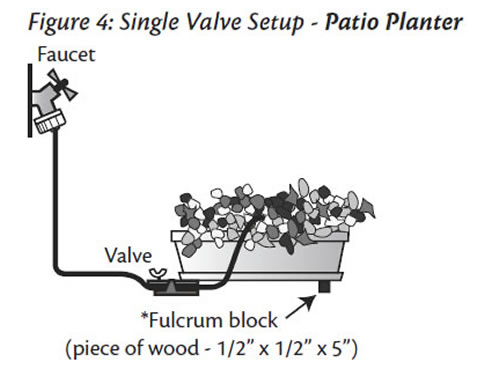
6. At the container location, run the tubing through the watering valve as shown. It will require considerable force to get the tubing into place (See Fig 1). For a basket, hang the valve from a support hook and then hang the basket from the valve. Allow enough tubing to hang down to within about 10 inches of the soil (See Fig 3). Then place the available optional fertilizer on the end of the tubing as shown. For a planter box or pot, place the valve under the container as shown. Allow enough tubing to go over and into the plant, supported by a stake. In both cases the end of the tube should be visible to be able to see the water dripping into the container (See Fig 4).
7. For best results, thoroughly hand water the container to the desired moisture content – fully moist, but not dripping. This is the fully watered weight the device should then be set to (by adjusting the wingnut) so that it just does not let water through at that fully watered weight. For hanging baskets this means watering until the baskets is dripping. After the basket has stopped dripping, the remaining weight will be the optimum weight at which the basket is moist inside, but not so wet that it is still dripping. Any weight loss due to evaporation from then on will cause the device to open and let water drip in to re-establish the set weight.
8. Release all the tension on the control valve spring by turning the wing nut counterclockwise. (this closes the tube at the pinch point in the devices).
9. Turn on the water faucet.
10. Now slowly turn the wing nut on each valve clockwise (compressing the control spring) until water just begins to drip into the container. Then turn the wing nut back slightly until it just does not drip. The container will now be maintained this moisture level. Any loss in weight will cause the device to open slightly allowing water to drip in to re-establish the set weight. Note; turning the wing nut clockwise increases the flow. Turning the wing nut counterclockwise decreases the flow.
11. Monitor each container over the next day or two, only adjusting the wing nuts slightly if needed. Only adjust in very small increments (1/16th turns) otherwise you will find yourself chasing the set-point. Note: The effect of a small change in drip rate may only be seen several hours later. If step 10 above was correctly followed, this step should be unnecessary.
12. To winterizing - disconnect the 3/4 x 1/8" reducer from the hose faucet. Also if a hose Y connector has been used, remove it too. No further winterizing is necessary.
Click the images below for a detailed view.